HOW I BUILD GUITARS
MATERIALS
NECK & HEADSTOCK
HEADSTOCK: HEADPLATE & VOLUTE
SIDE BENDING
THE RIM
KERFED LINING
CUTTING THE RIM TO WIDTH
SIDE BRACES
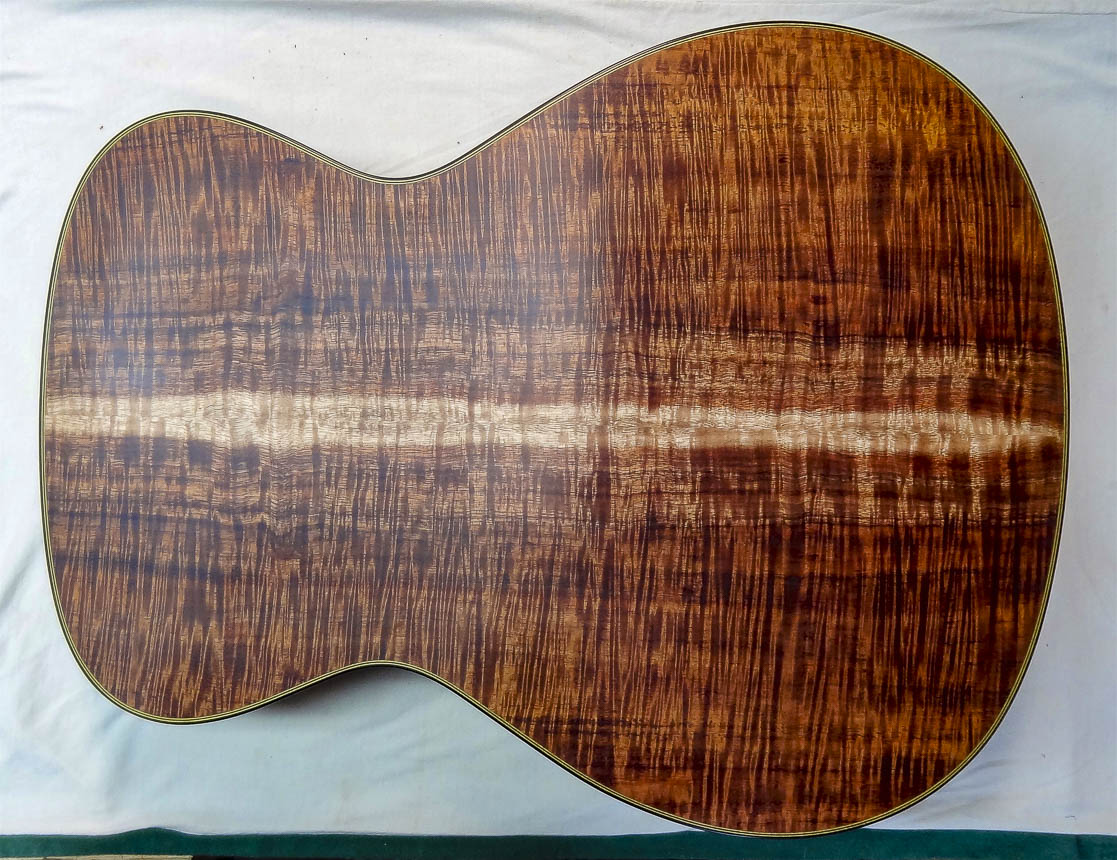
TOP & BACK PLATES
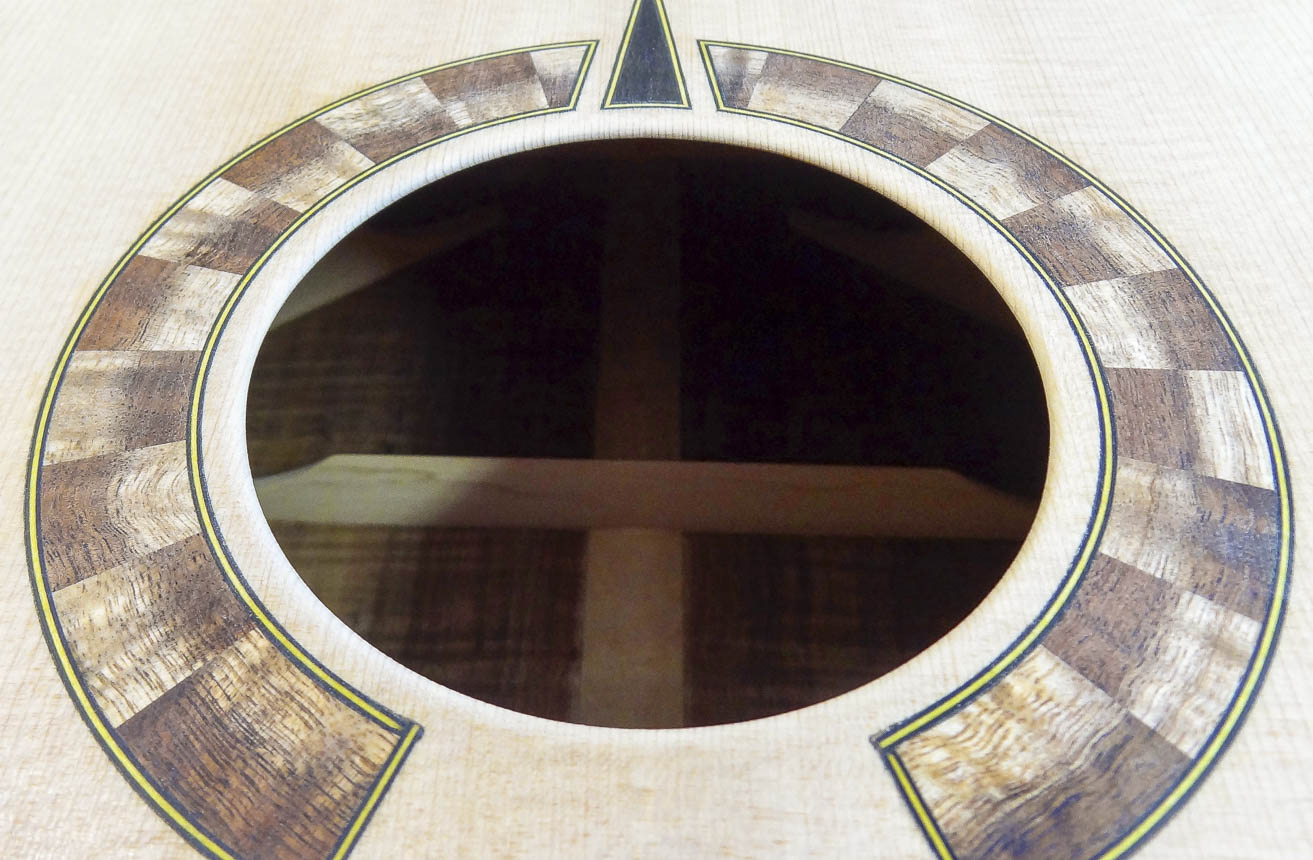
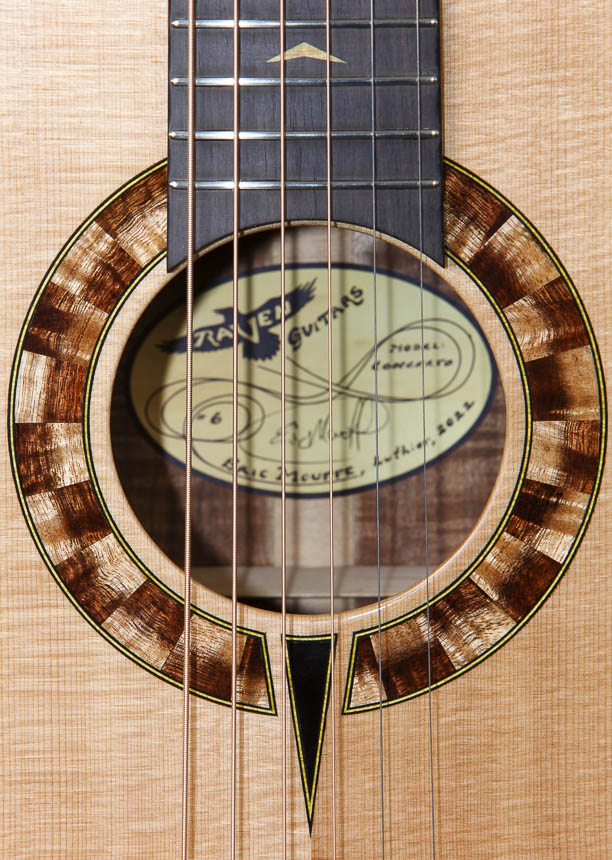
ROSETTE
BRACING THE TOP
BRACING THE BACK
THE BOX
BINDING & PURFLING
FITTING THE NECK TO THE BODY
THE FRETBOARD
HEADSTOCK SHAPE, TUNER HOLES, BINDING & PURFLING
GLUING THE FRETBOARD TO THE NECK
SHAPING THE NECK
SHAPING THE HEEL
SHAPING THE VOLUTE
THE BRIDGE
FRET JOB
This Page
THE FINISH
ODDS & ENDS
SET UP & FINAL DETAILS
THE FINISH
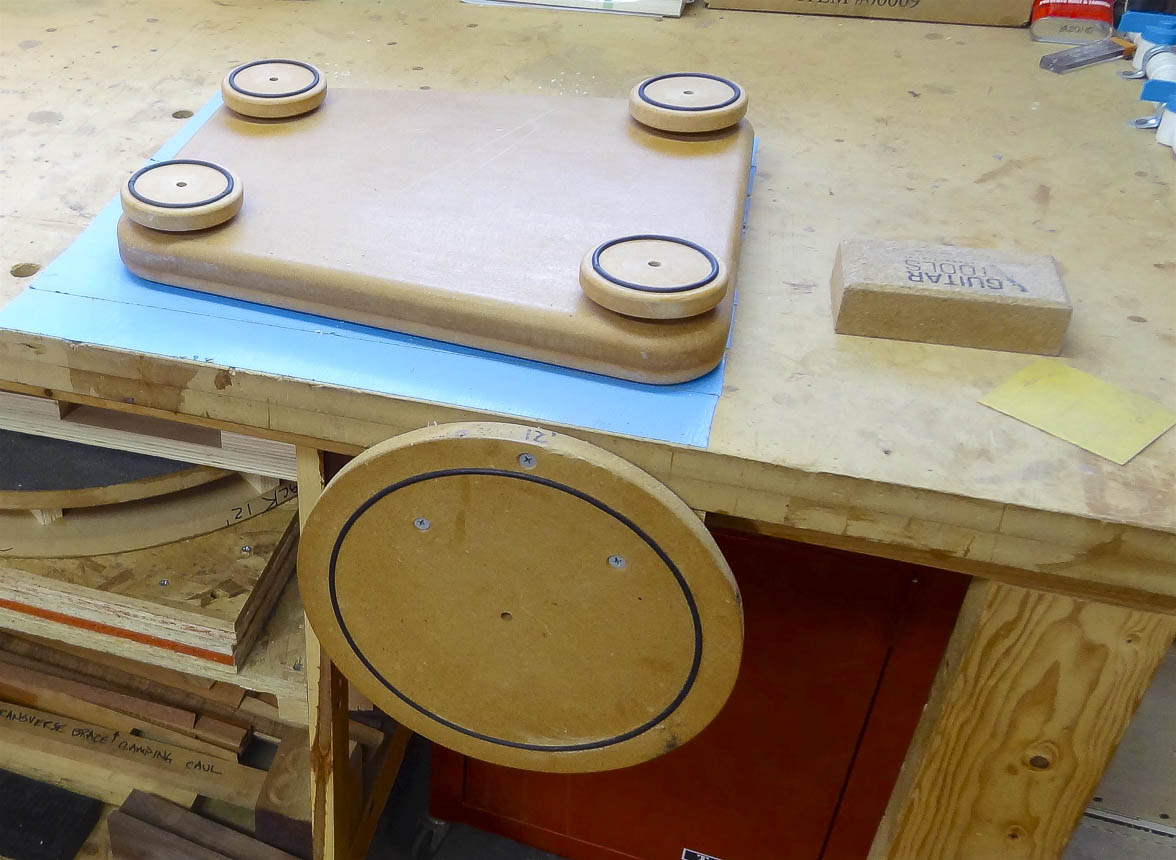
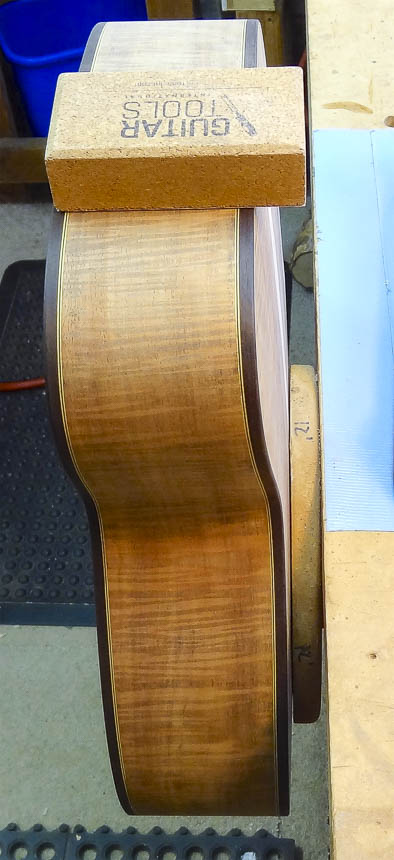
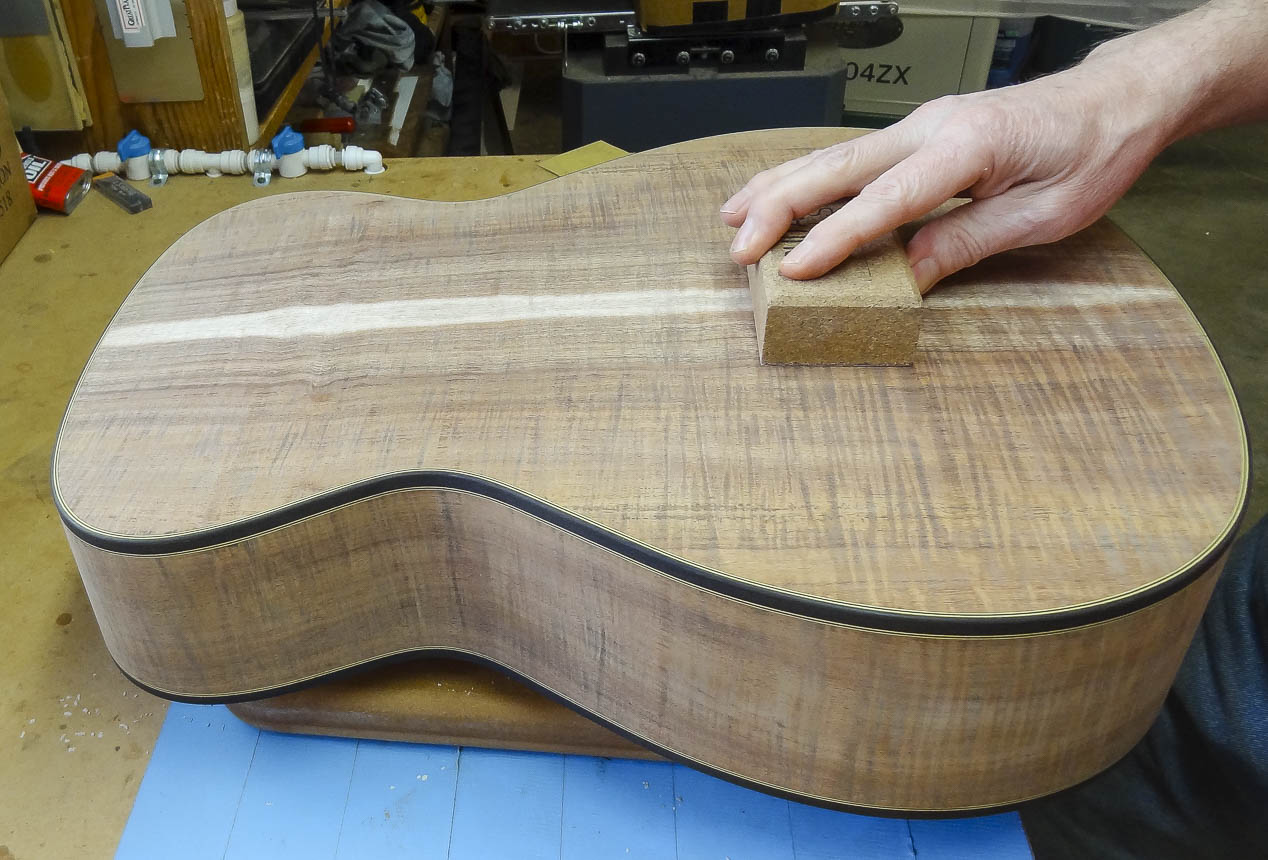
The finish I put on a guitar does three things very well. It provides protection for the wood, It brings out the beauty, color and luster in the wood grain. And it showcases any flaws in my woodworking. The first step in the finishing process is to inspect the woodworking with a fine tooth comb looking for things like scratches, dents, gaps and glue not completely sand away. I have vacuum fixtures to help hold the body and I spend a good deal of time finding and fixing all of these flaws, making sure all the surfaces are sanded and shaped the way I like it with a fine grit sand paper.
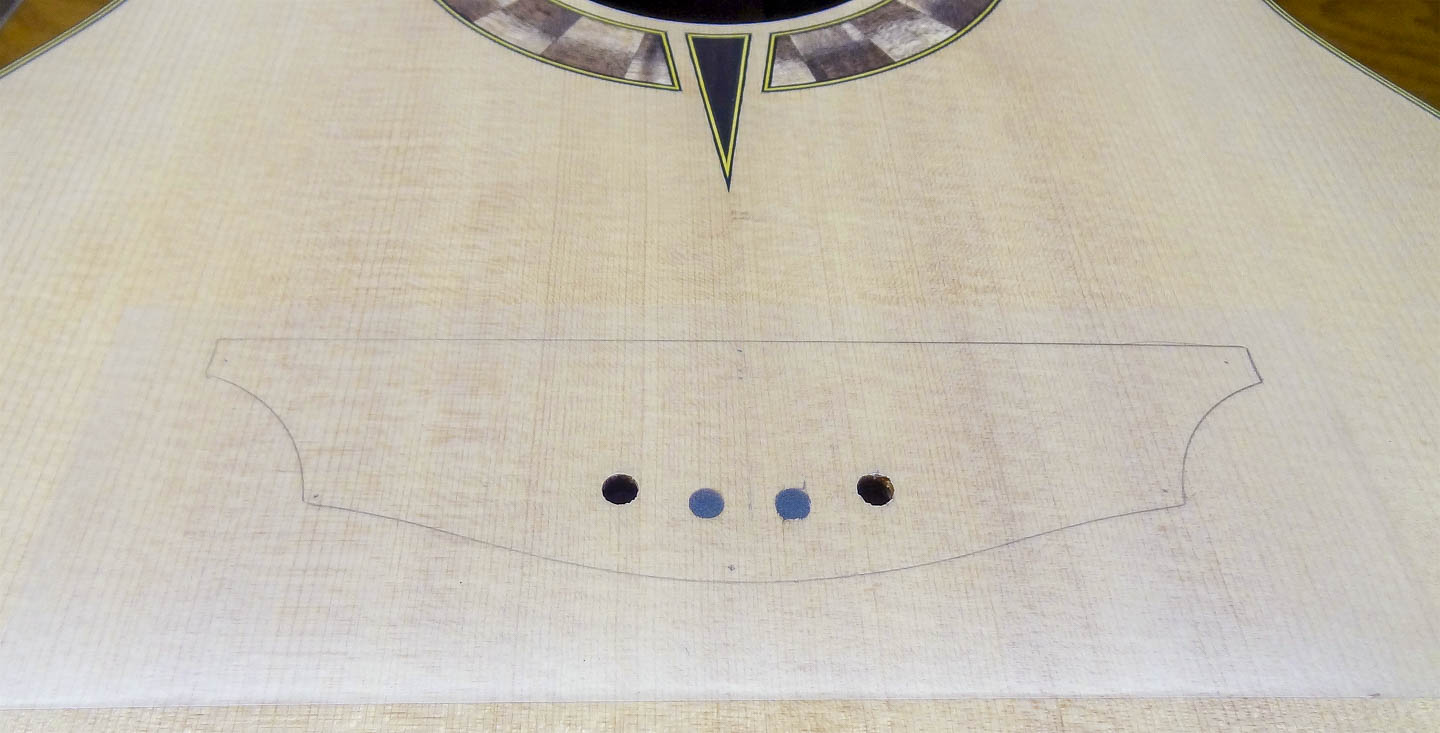
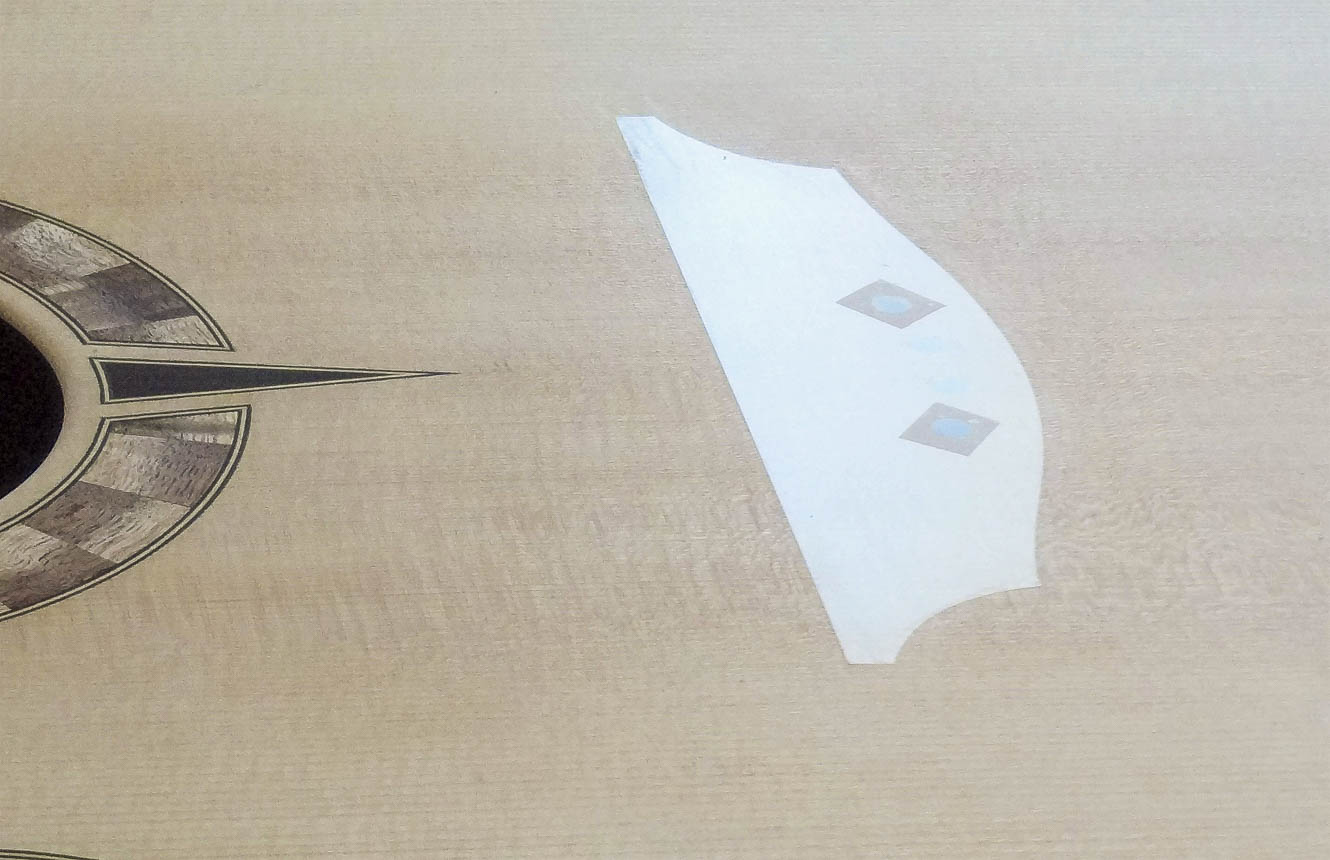
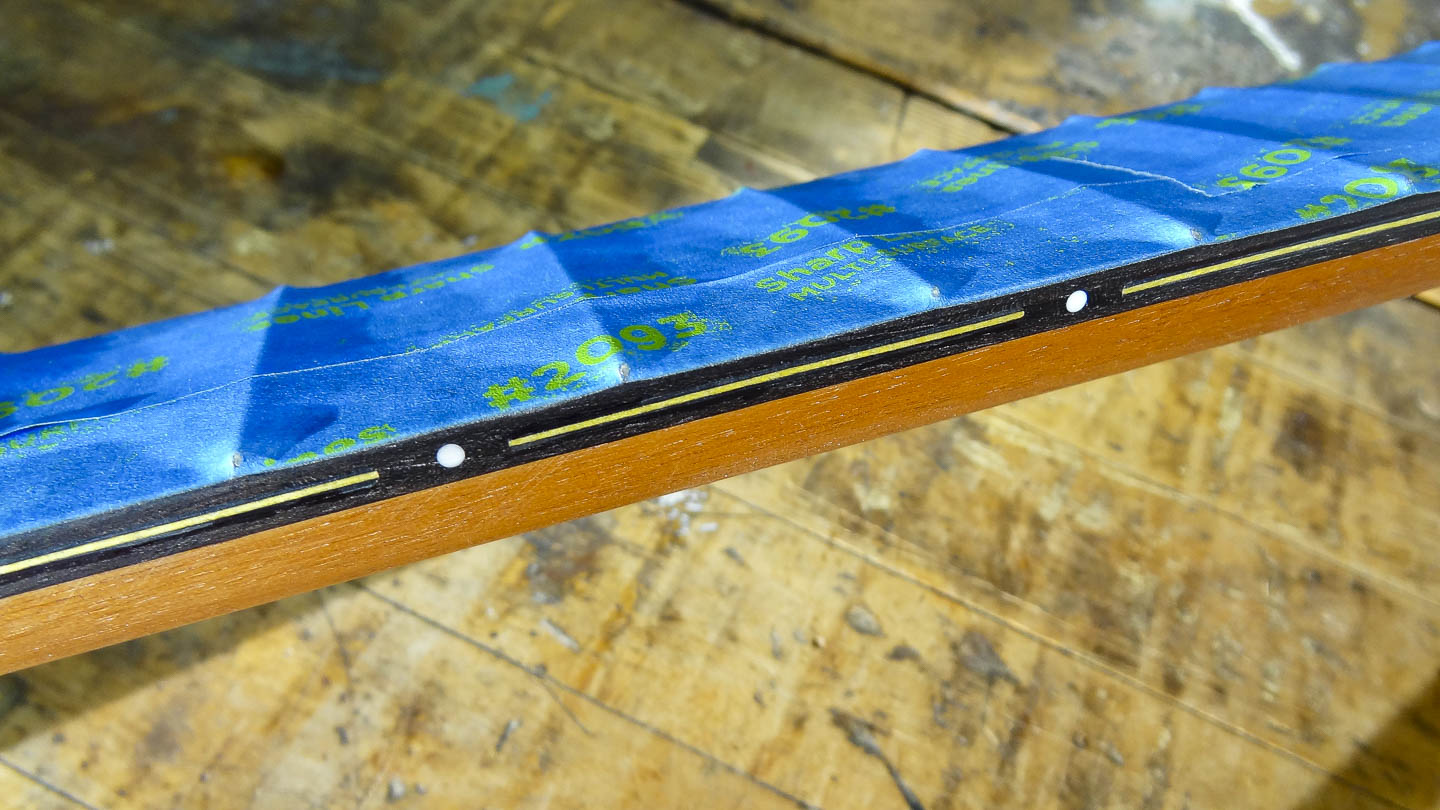
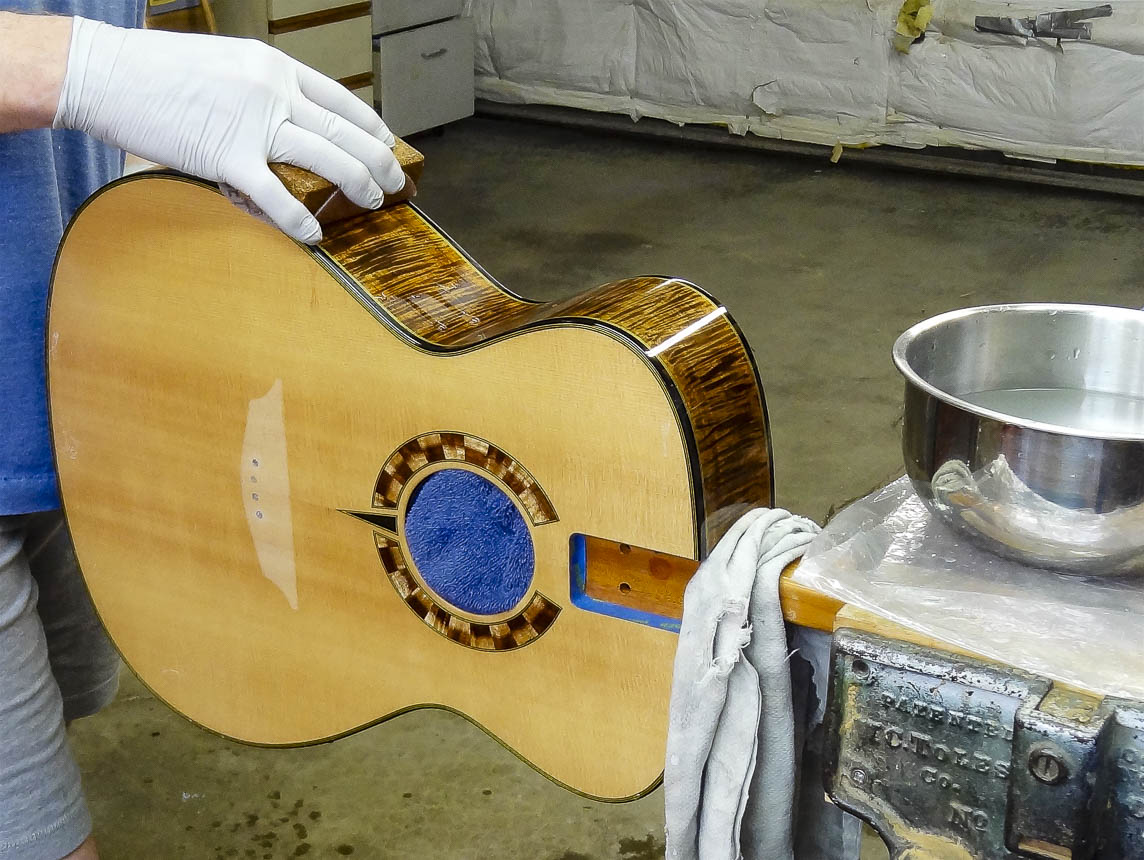
Before the finish is applied, the wood needs to be cleaned of contamination that could react with the finish and create trouble for me. I wash the wood in a three step process with naphtha, mineral spirits and a water/ammonia solution. The water in the last step raises the grain in the wood, giving it a sort of fuzzy feel, so I finish up with one final light sanding and final inspection. The areas that don’t receive finish are masked off with tape. Of special concern is masking off the top where the bridge will be glued on. A sticky backed film is placed over the bridge area, the bridge is indexed to the top with the bridge pin holes, and the outline is drawn on the film. The perimeter edges of the bridge will ultimately overlap the finish by a fractional amount, so the film is cut away just inside the drawn outline, which leaves the perfect mask.
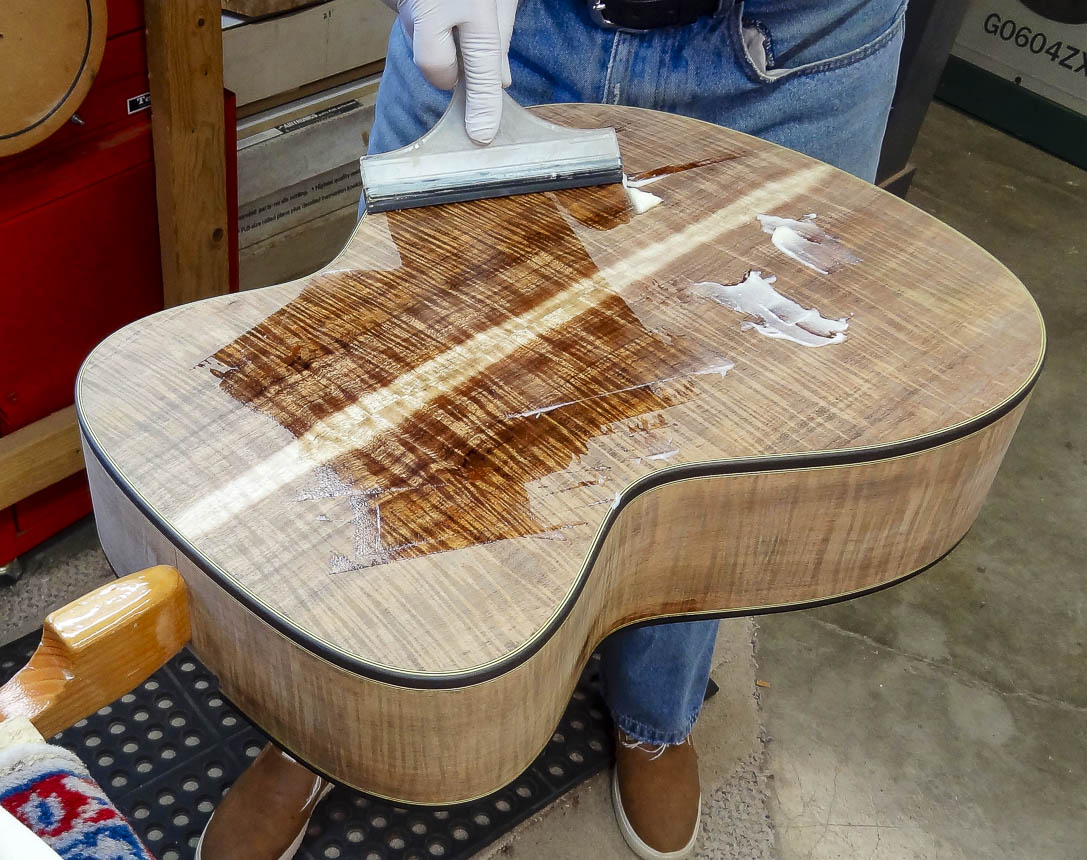
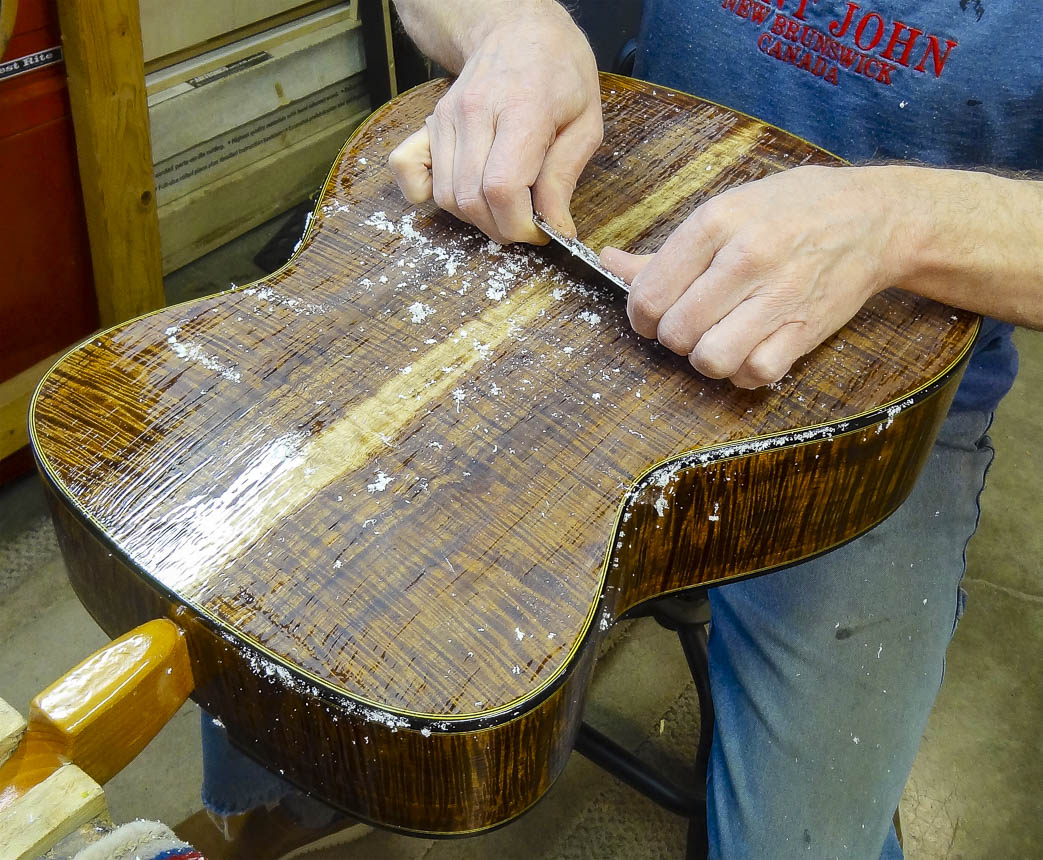
The expectation on a modern guitar is to have an absolutely smooth surface finish. If a high gloss sheen is chosen, the surface is so polished you can see your reflection in it, like a mirror. This means all the pores in the wood need to be completely filled so the surface is perfectly level; if it’s not level, your reflection will look wonky, like a Salvador Dali painting. There are many way to accomplish this, and most of them are a royal pain in the butt to get right. I use epoxy with a silica thickener to fill pores. I spread on a thin coat, then scrape and sand down the high spots after it cures, repeating this one or two more times until the surface is smooth. It’s a very labor intensive process.
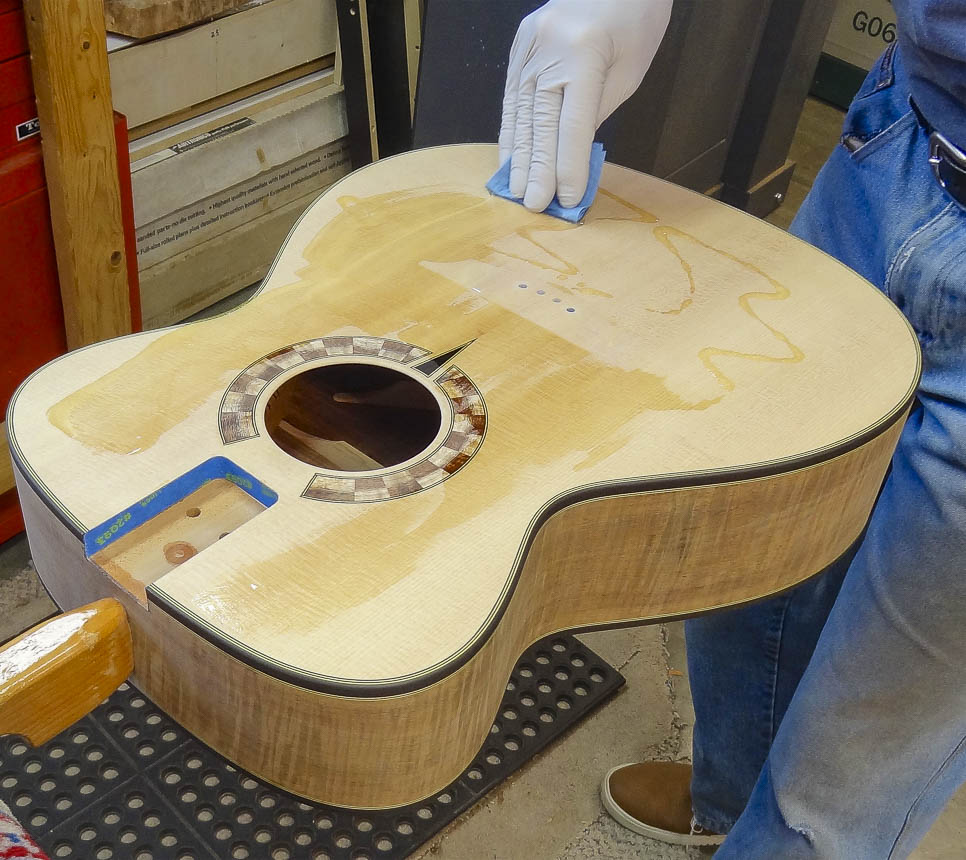
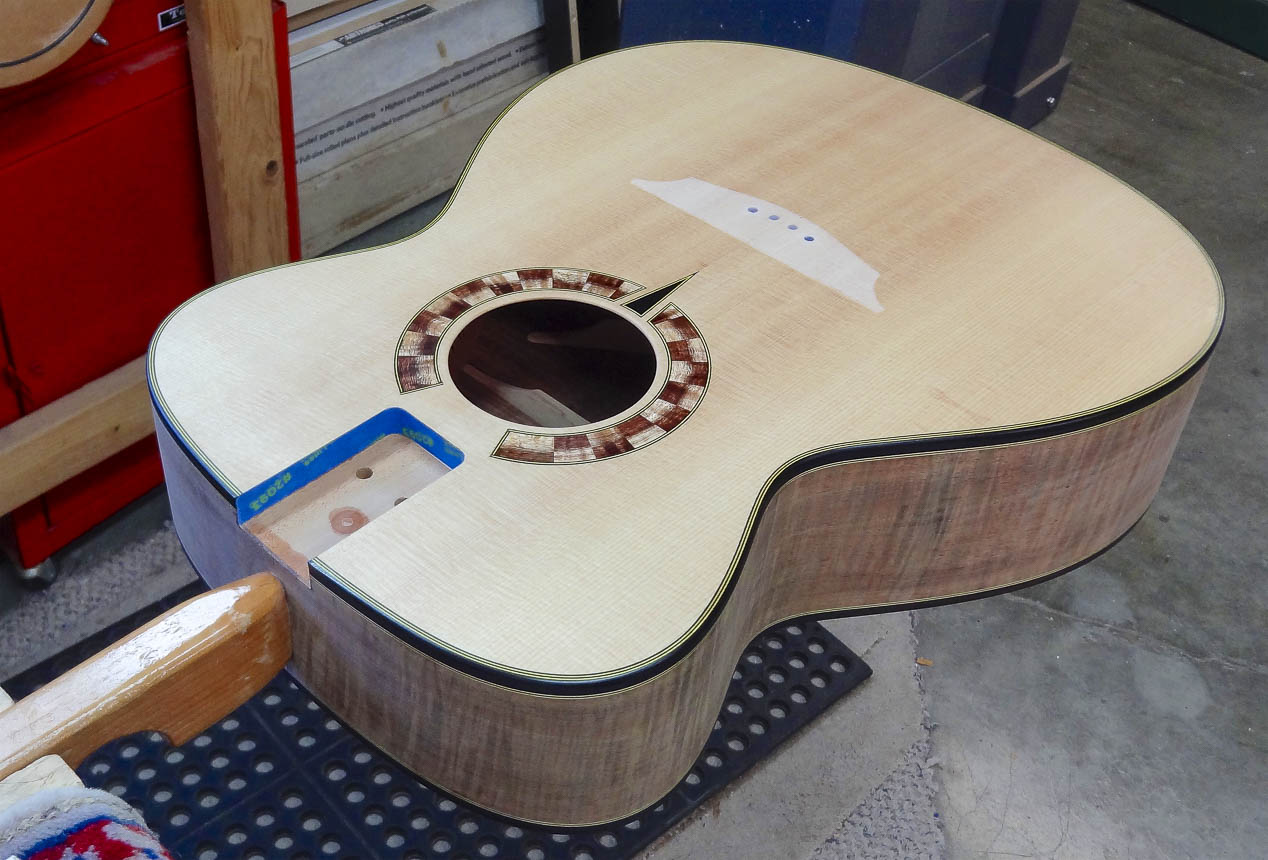
Because the spruce top doesn’t have pores to fill, most guitar makers don’t do anything beyond applying the primary finish. I like to borrow a technique from the Canadian master arch-top guitar maker Ken Parker. I apply the same epoxy as was used on the back and sides, but before it cures I wipe all of it away. This leaves a microscopic film that adds just a bit of smoothness and extra protection without affecting to tonal qualities of the top.
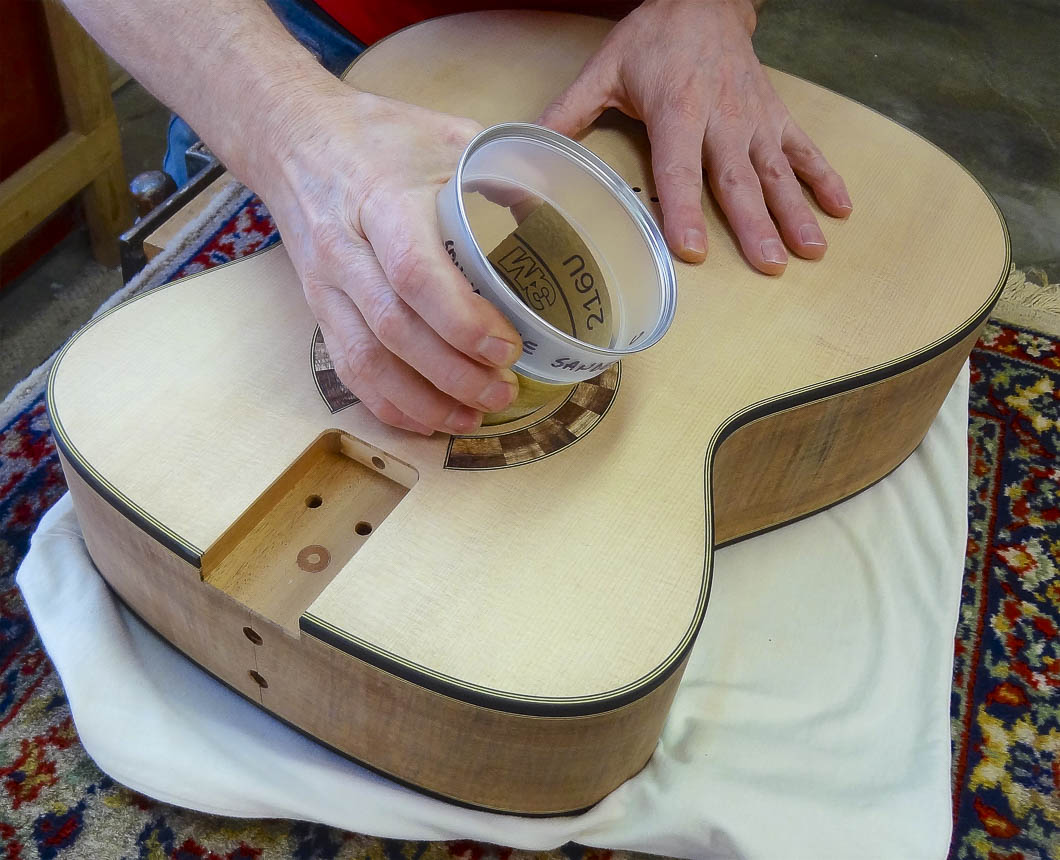
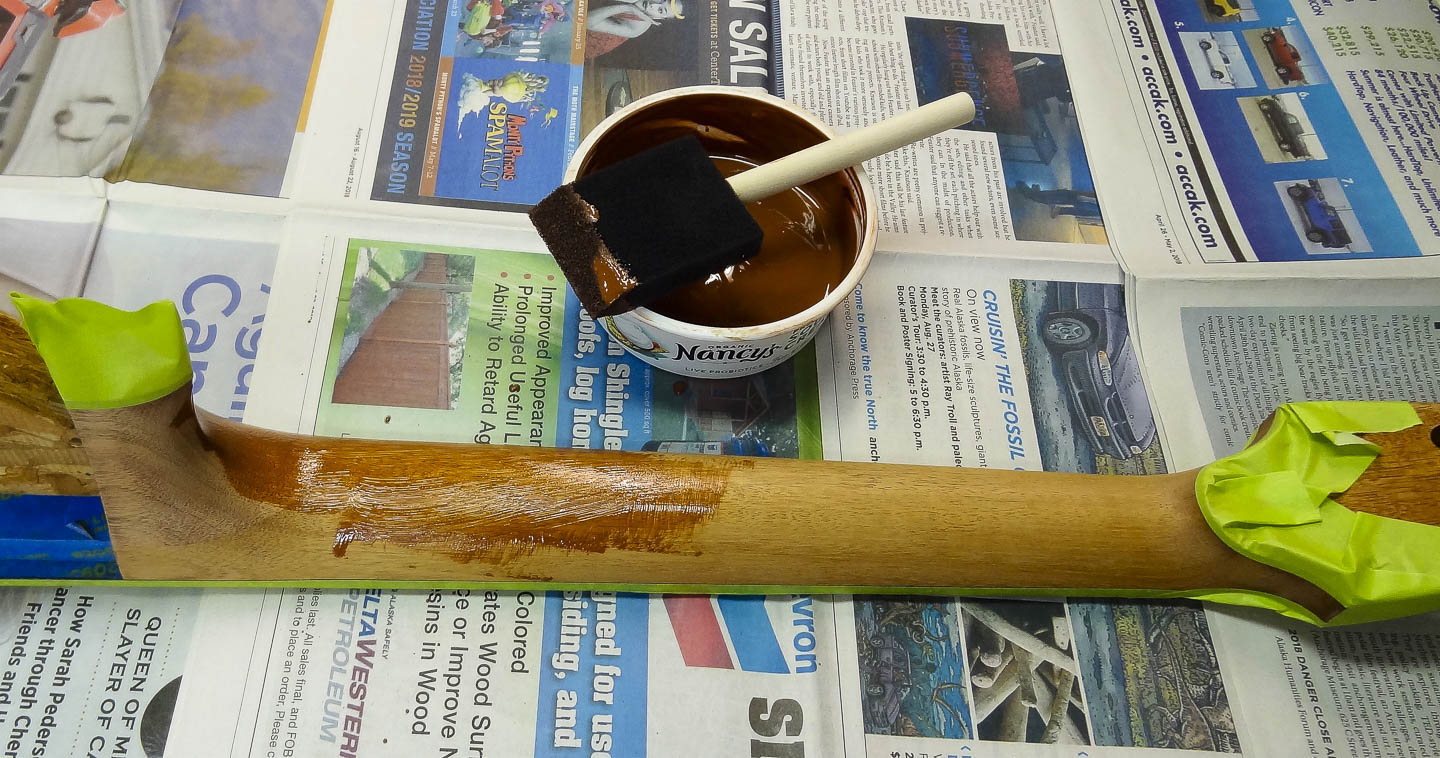
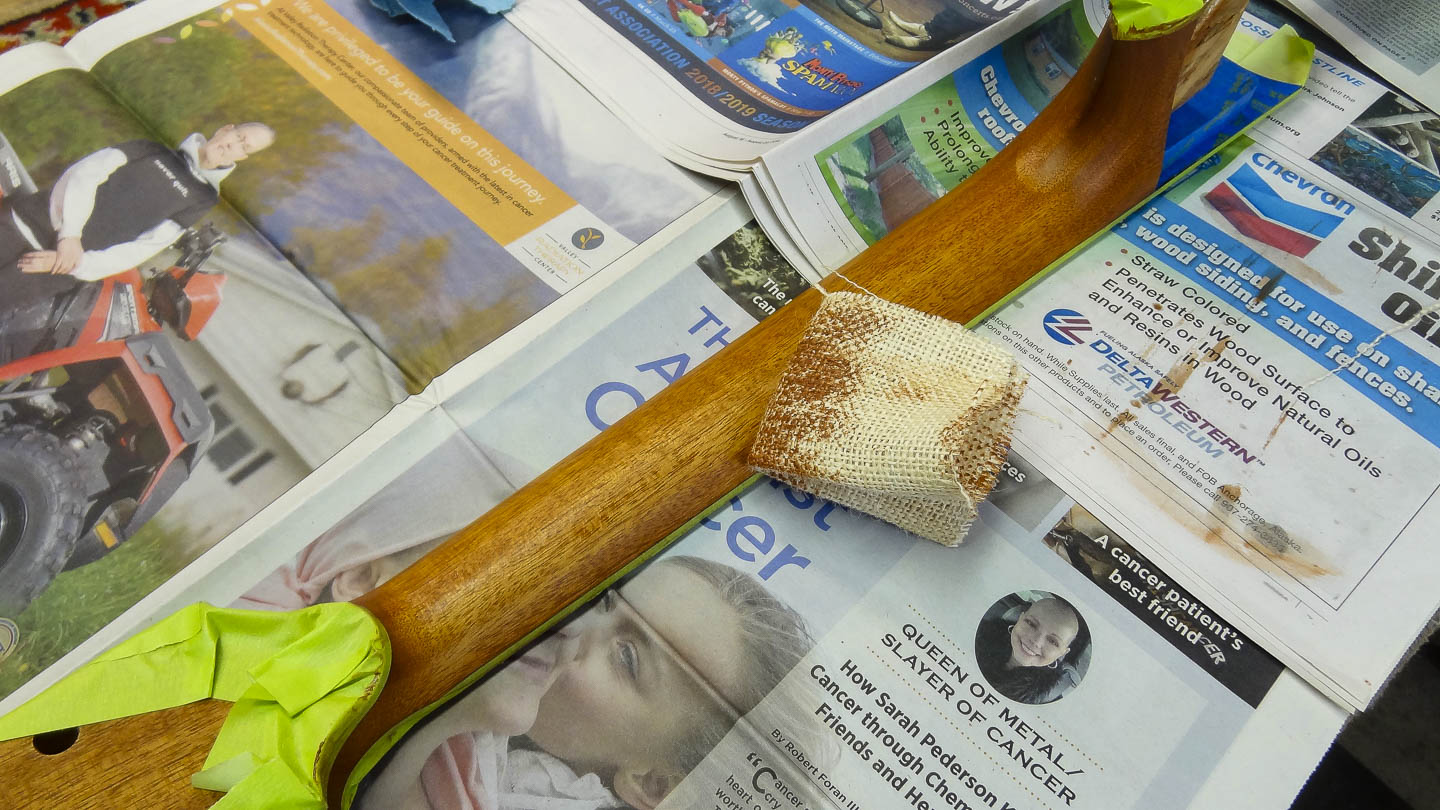
The neck needs to be stained a little darker so it will be more congruent with the dark koa wood of the body. I kill two birds with one stone by mixing stain into an oil-based grain filler and brush it on. It fills the pores nicely and I wipe off the excess with burlap cloth. As an alternative, I could use stain alone, and when it’s dry fill the grain with epoxy. The edge of the fret board was masked off to protect it from the stain, but it will need finish, so is use a sanding stick to thin the tape right at the corner and peel the excess tape off.
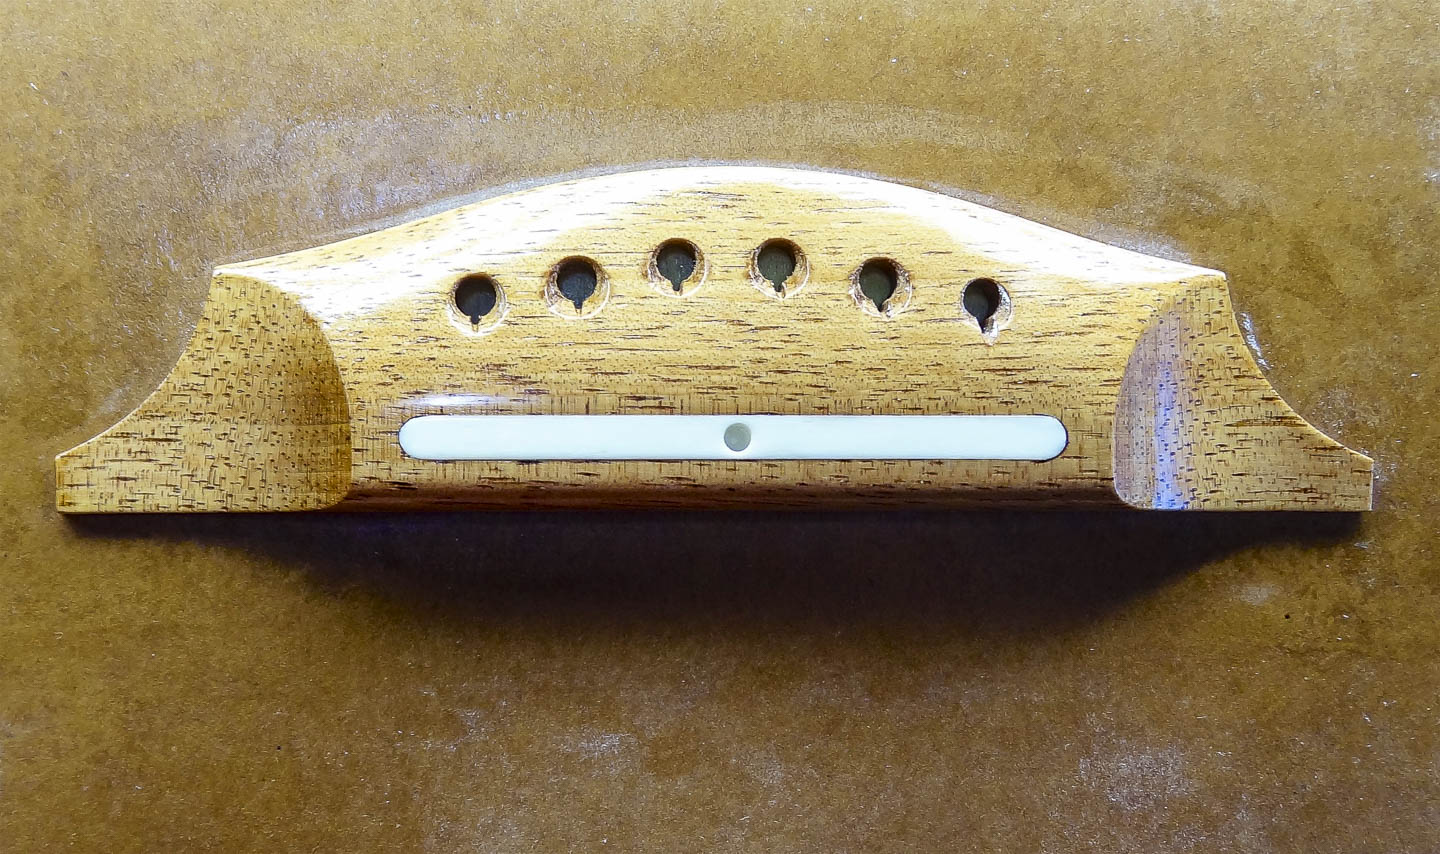
The bridge on most guitars is not finished because it’s made of a dense hard wood with tight grain and no pores. I use a different type of wood and sometimes dye it black to give it a more traditional look. On this one, I leave it natural but put on several coats of shellac to bring out the color.
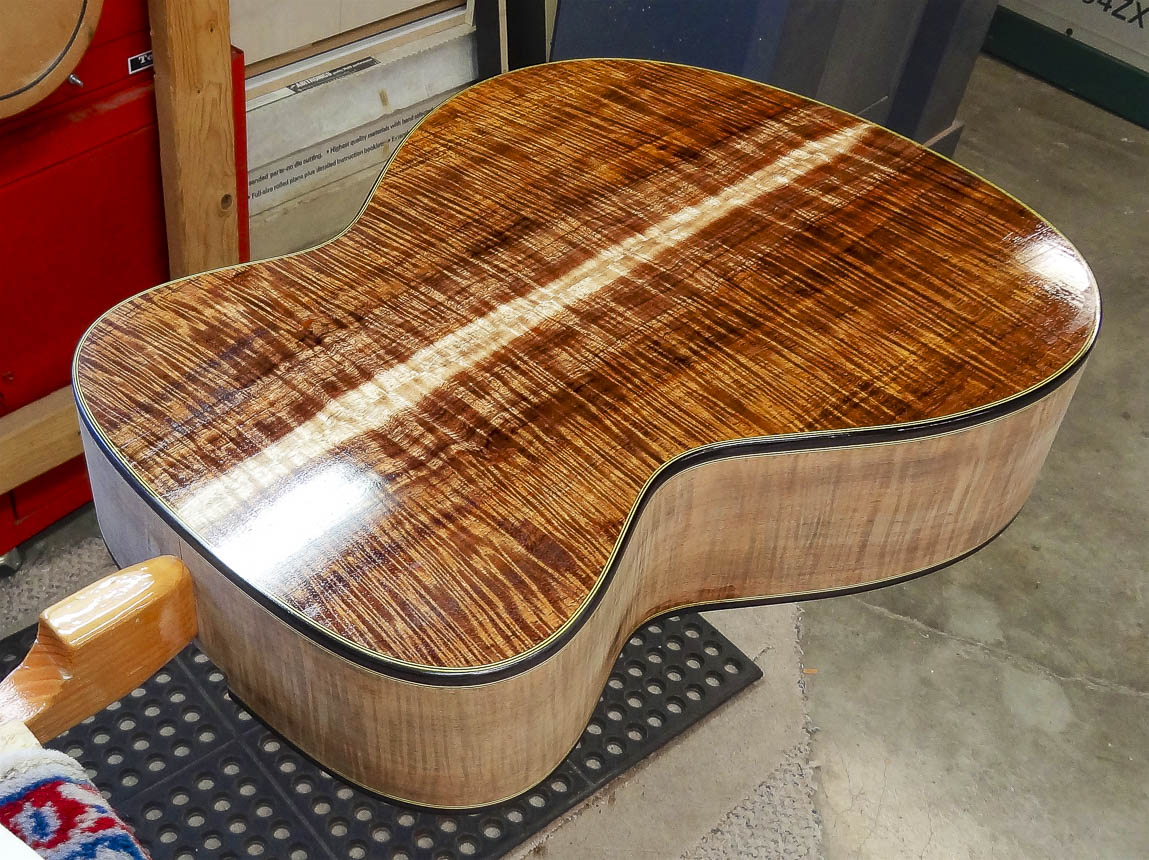
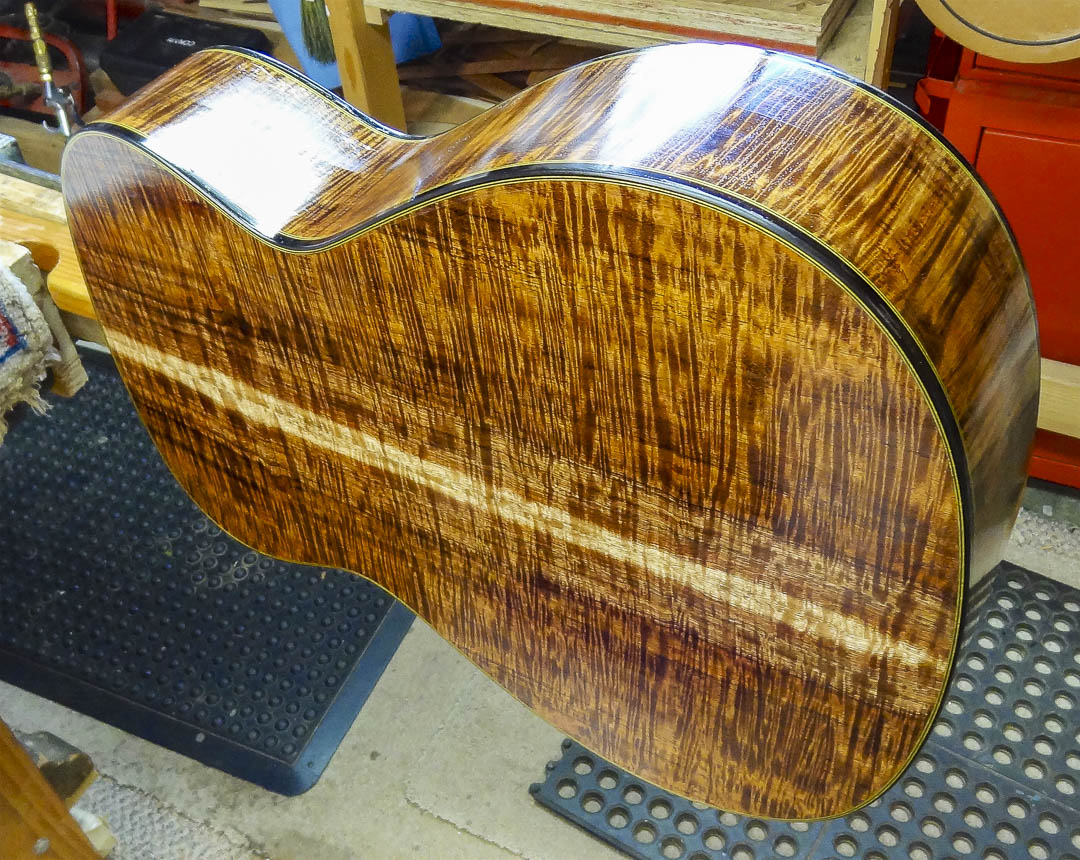
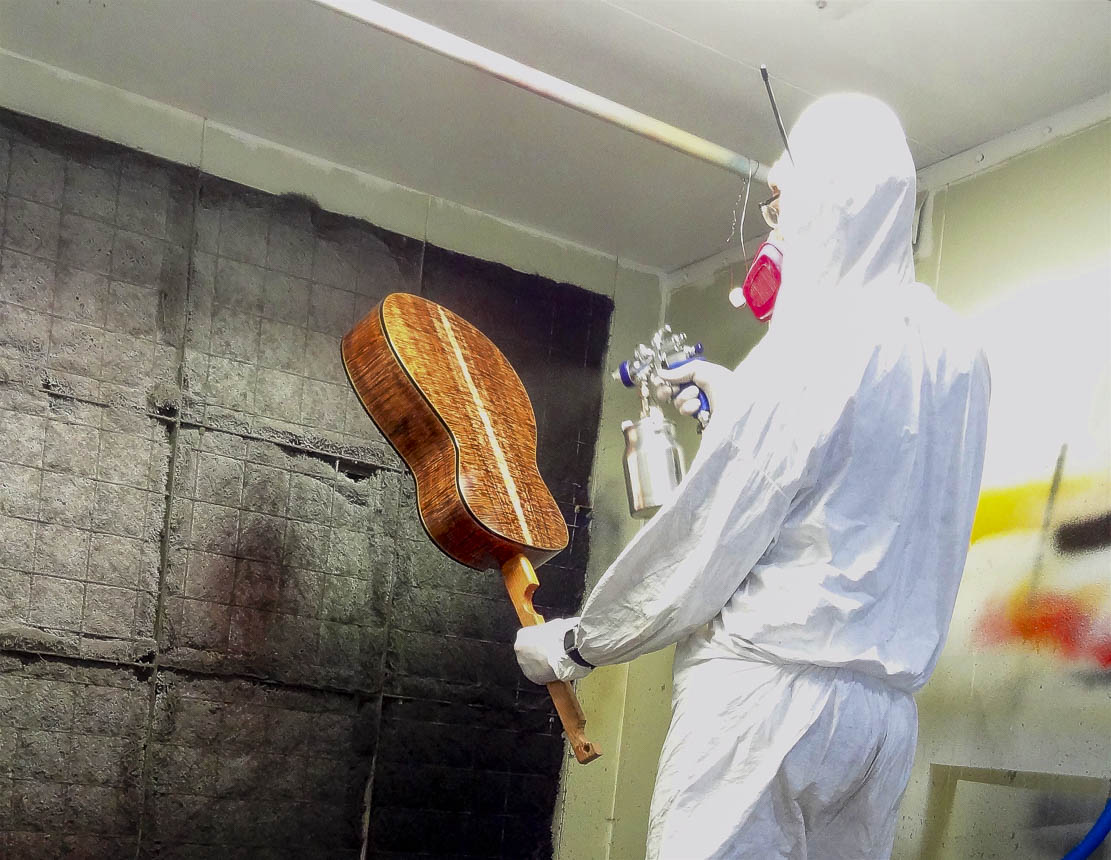
I use instrument-grade nitro-cellulose lacquer and spray on the finish with a high pressure, low volume (HPLV) system in an industrial spray booth. This stuff is pretty toxic, so wearing protective equipment is essential. With drying time and light sanding between coats, I can spray on about four coats per day. For this guitar, I spend two days and put seven coats on the neck, back & sides, and six coats on the top. This is two coats less than I normally use, but I’m experimenting with how much finish I put on my instruments. Too much lacquer on the top can affect the sound in detrimental ways, and more on the rest of the guitar is just a waste of material. Too little, and I could sand through to bare wood during level sanding (not good). As a note, after all the level sanding and buffing, the finish over the bridge mask measured .001” thick. That’s very thin. .005” is more normal. I didn’t sand through anywhere, but I will probably add one more coat on future guitars. The lacquer needs two weeks to fully cure before the next steps are completed.
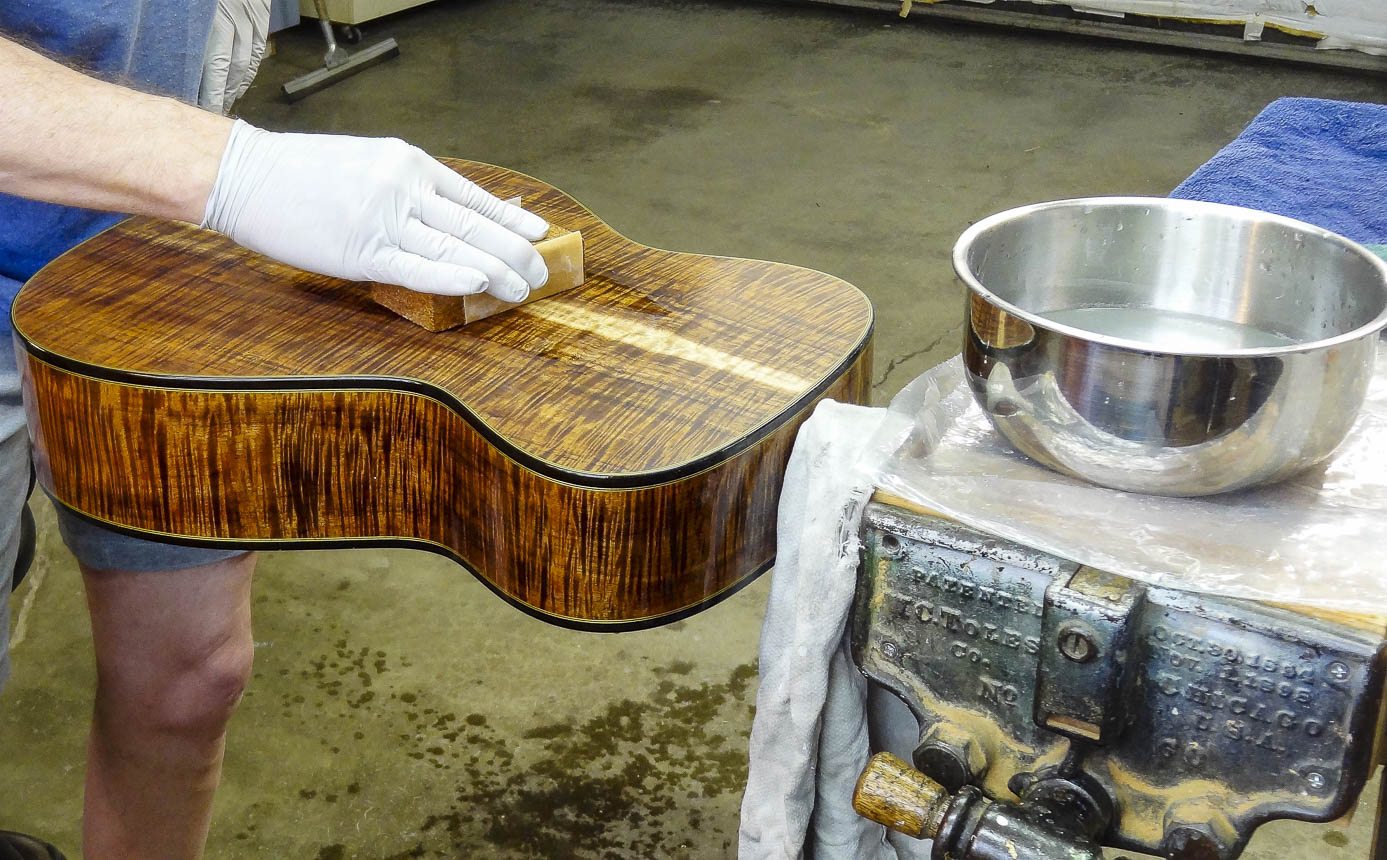
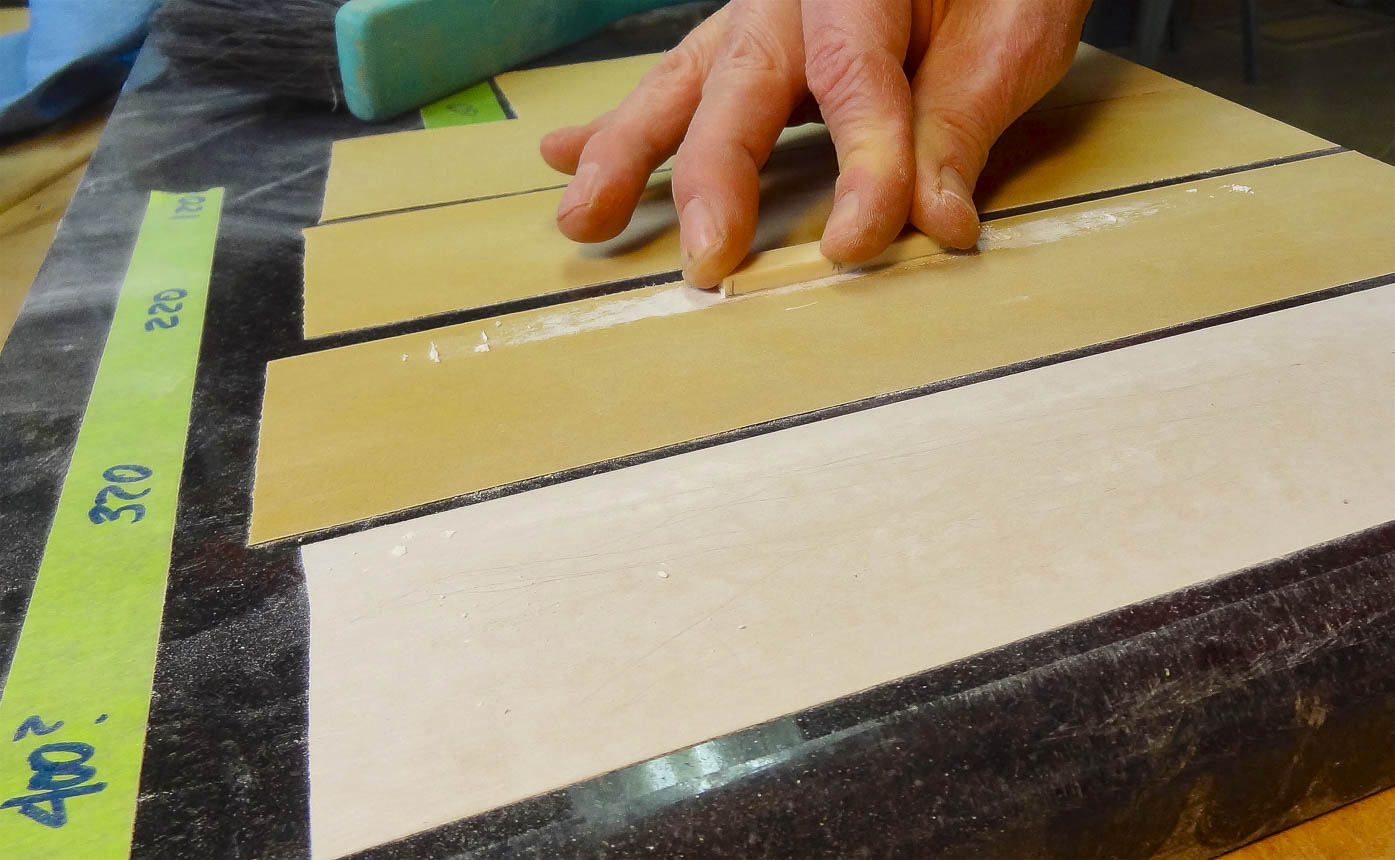
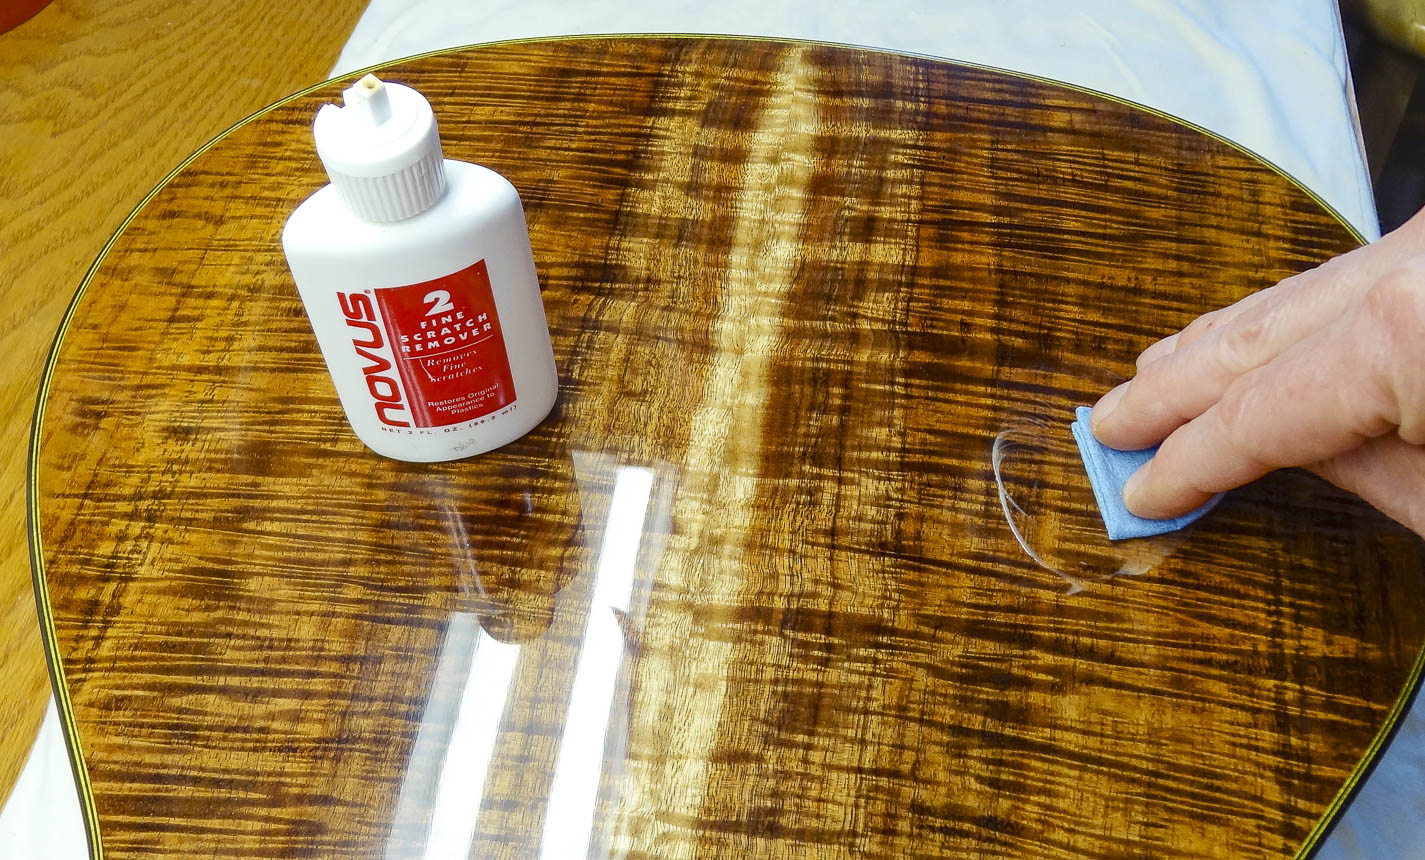
After the lacquer is fully hardened, I wet sand it to the perfectly smooth surface I talked about. Before I start wet sanding the finish it already looks great, with a very shiny sheen, and people might think it’s completed. Far from it. I use progressively finer grits of sand paper and water as a lubricant to get it absolutely smooth. The initial shininess is helpful in the process because it identifies spots that are low and still below the surrounding areas that have been sanded to a dull sheen. I start with a special mesh type sand paper with 600 grit and sand until there are no shiny spots. I repeat all this with 1000 and then 1500 grit which bring a lot of the luster back to a satin sheen. Unless satin is what the client wants, we’re not done yet.
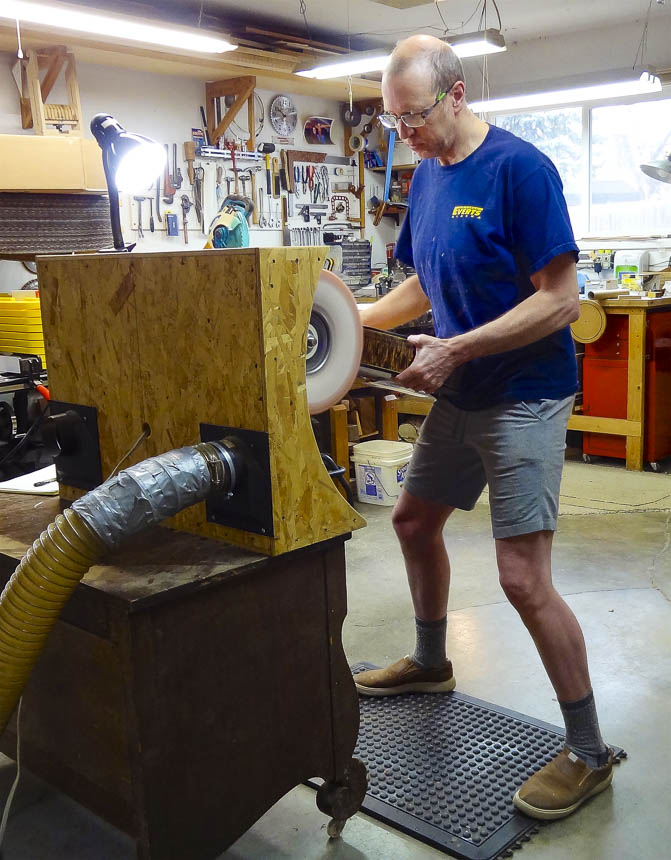
My buffer has two wheels. One uses medium grit buffing compound, and the other has fine compound. The two buffing wheels take the finish from a satin to the high gloss sheen. Care must be taken while buffing the guitar. If the wrong edge is presented to the spinning wheel, it can grab the part and throw it forcefully to the ground. It’s a heart stopping moment, I’ve been there.
As beautiful as it is at this point, we still haven’t achieved the mirror finish just yet, but it will have to wait until after the guitar has been set up and just prior to stringing it up for the final time. At that point I use a cloth and ultra-fine liquid buffing compound and go over the whole completed instrument until I can see my smiling face in the reflection; but you’ll have to wait until the end to see that. Sorry!
ODDS & ENDS
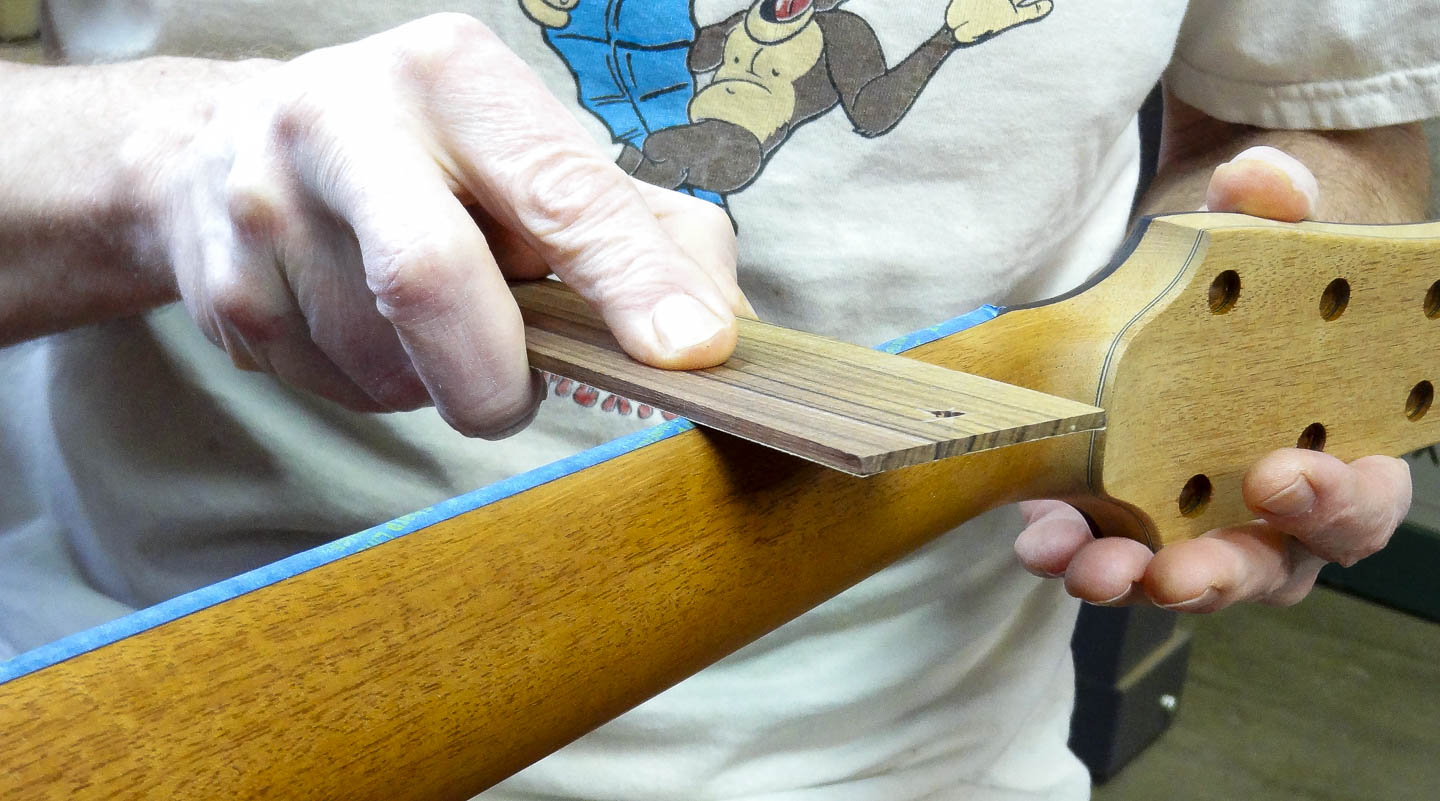
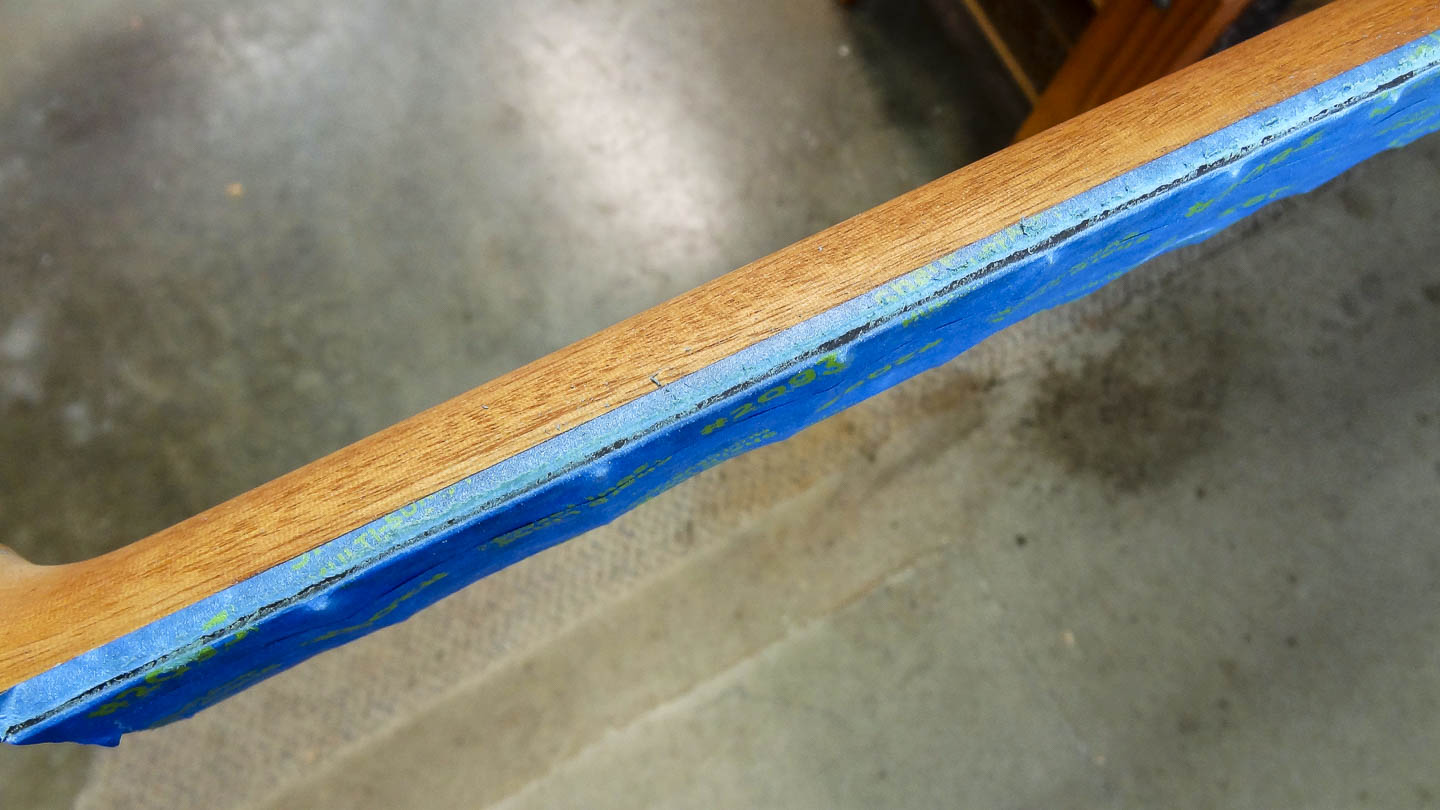
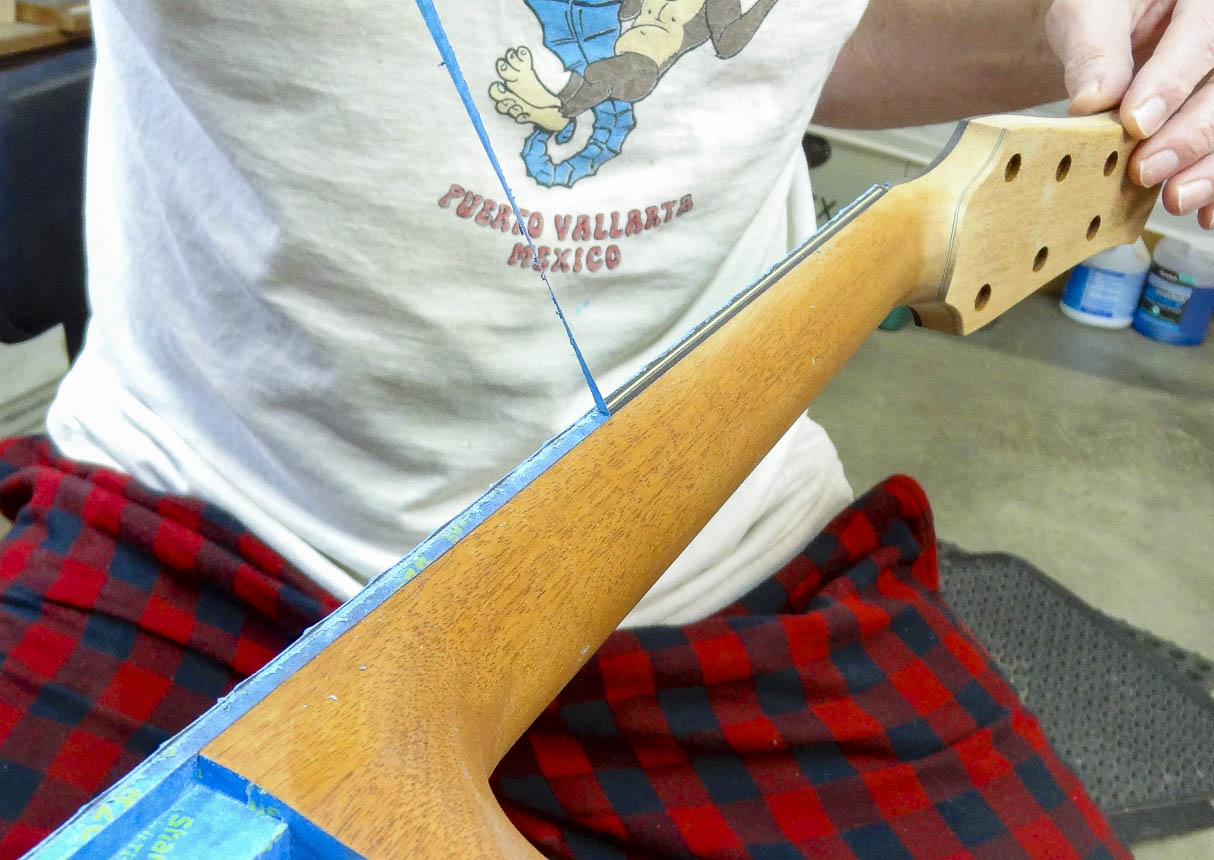
The guitar has the finish applied, and the masked off areas need to be unmasked. This sounds like a simple enough thing, but if I just start pulling on the tape, the lacquer along its edge will fracture into the finish and leave nasty looking cracks. To avoid this, the lacquer along the edge of the tape is thinned down using a sanding stick and scraping it with a single edge razor blade. This allows the tape to pull off with no issues.
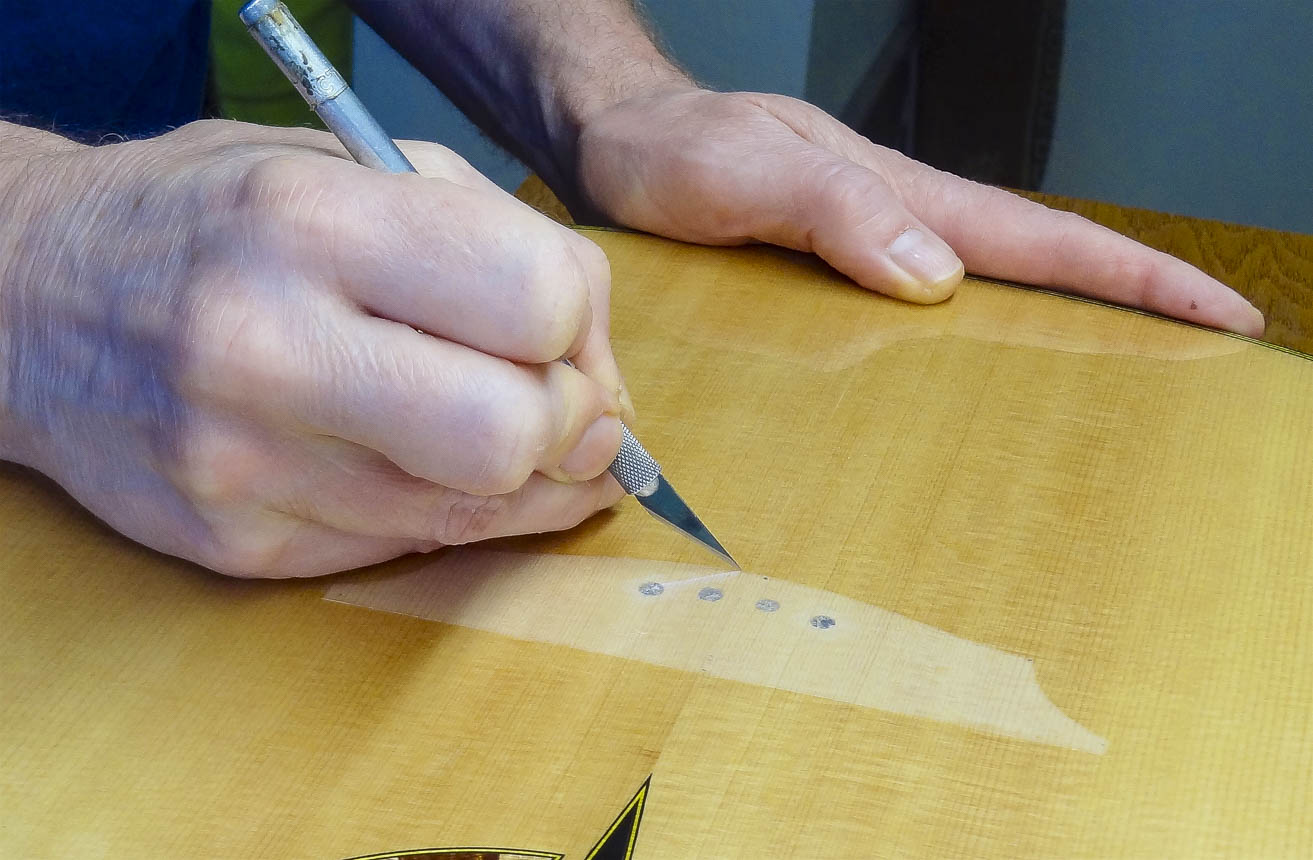
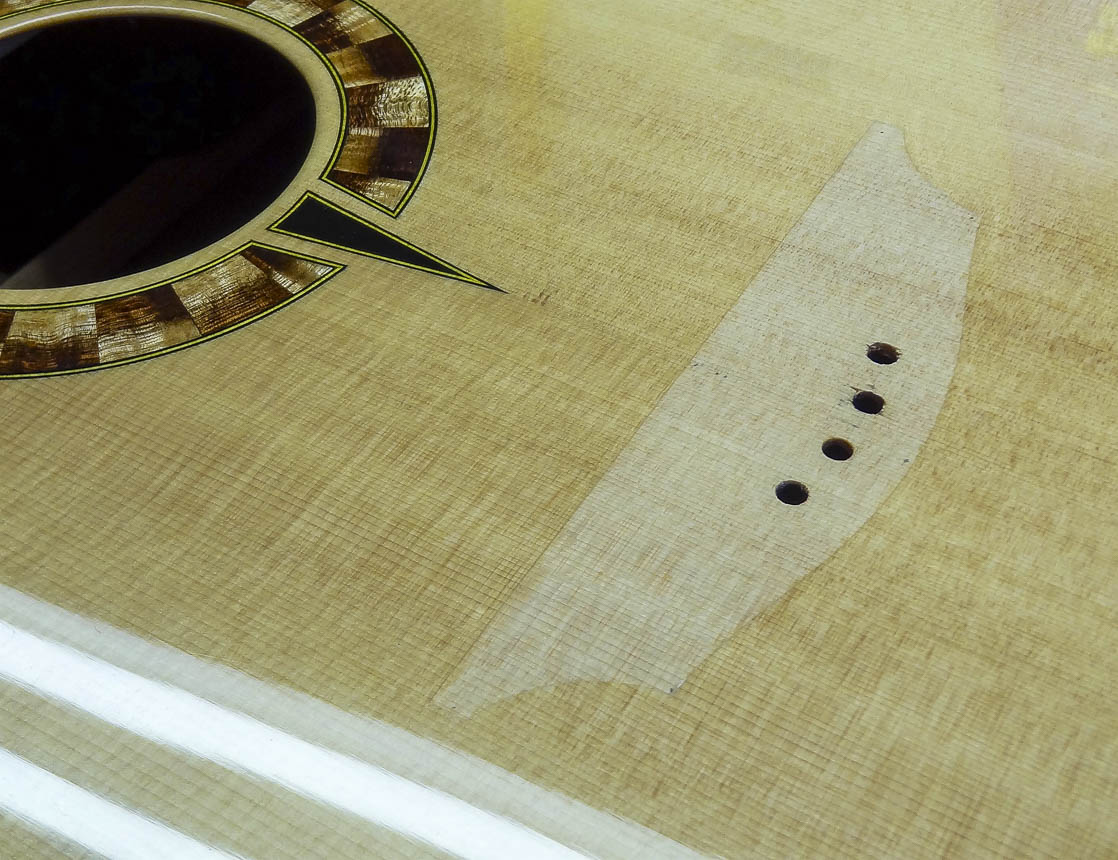
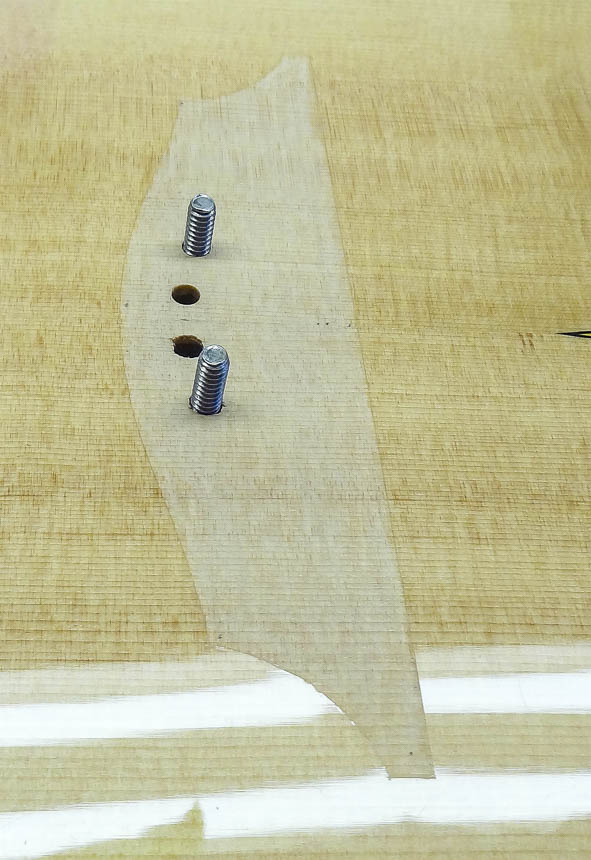
The bridge mask also needs to be removed to expose the bare wood for gluing on the bridge. I use an Exacto to cut through the lacquer right along the outline of the mask, being careful to not cut into the wood of the top. I get under the mask at a bridge pin hole an gently pull it off. The perimeter of the bridge overlaps the lacquer a very small amount so when the bridge is glued on, it looks like the finish goes right underneath the bridge. I usually put a very small step around the perimeter of the bridge’s bottom surface. The step rides up over the lacquer and allows the bottom of the bridge to seat fully on the top’s wood. There’s a lot of stress on the bridge from string tension, so a strong glue joint is imperative. On this guitar, however, the finish is so thin this step is not required.
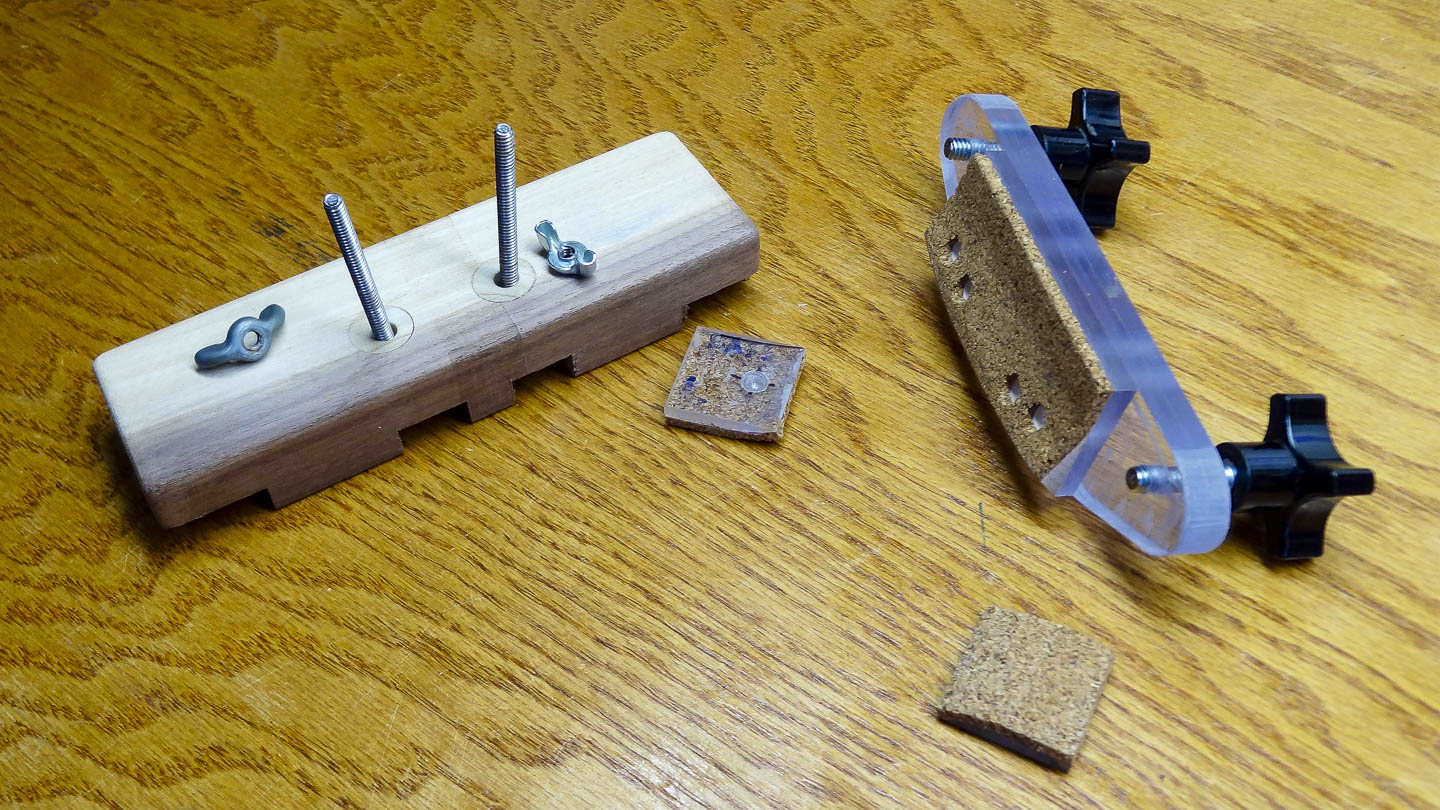
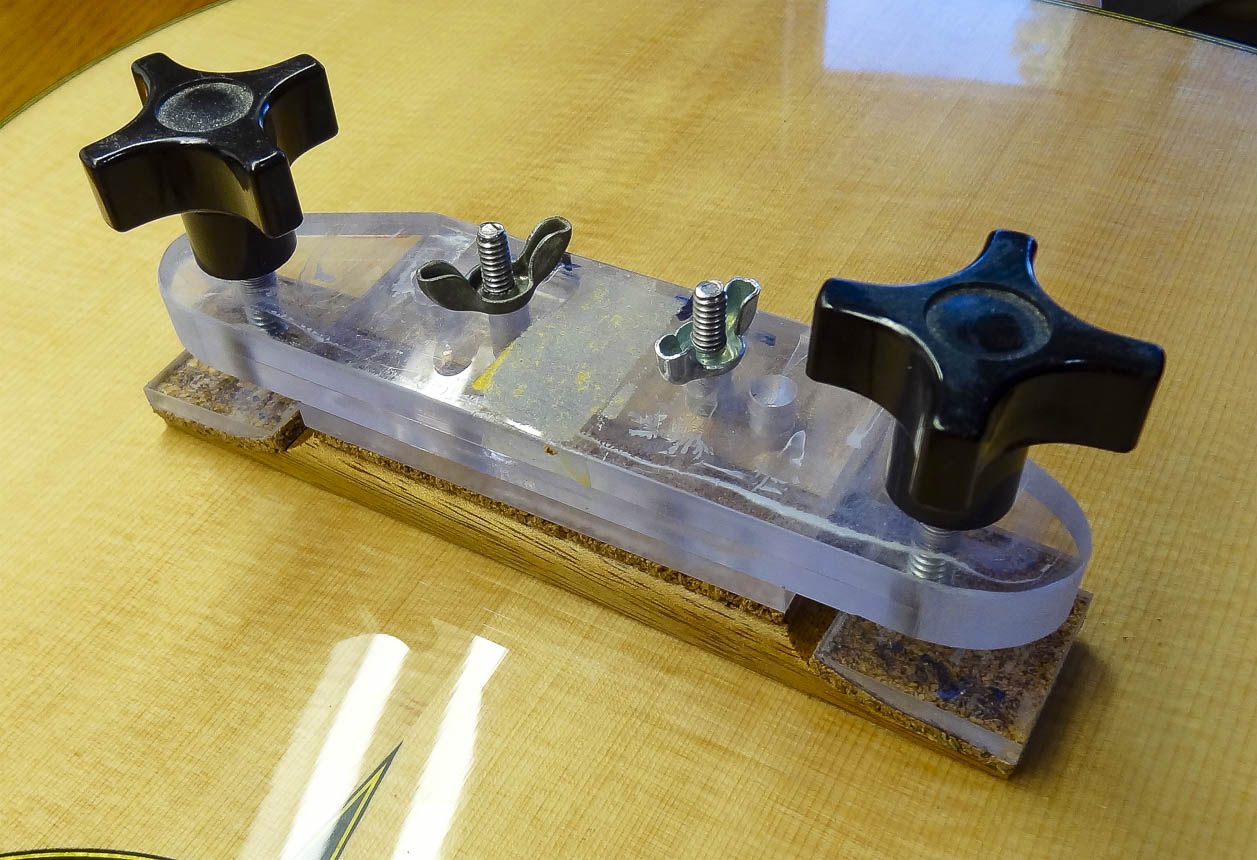
My jig to glue the bridge on is comprised of a few parts. A hardwood caul that fits over the top’s bracing and rests against the bridge plate inside the body, two long bolts that come up through the caul and bridge pin holes, another clamping caul shaped to the top of the bridge, and two cauls that put pressure on the wings of the bridge. I set the internal caul in place with the bolts slightly protruding out of the top, spread glue on both wood surfaces and slide the bridge over the bolts and onto the top; the bridge pin holes align everything perfectly. Wing nuts on the bolts are screwed down to clamp the bridge in place. The wing cauls are positioned and threaded knobs are screwed down to clamp the wings. Once everything is clamped down I clean up the glue squeeze-out.
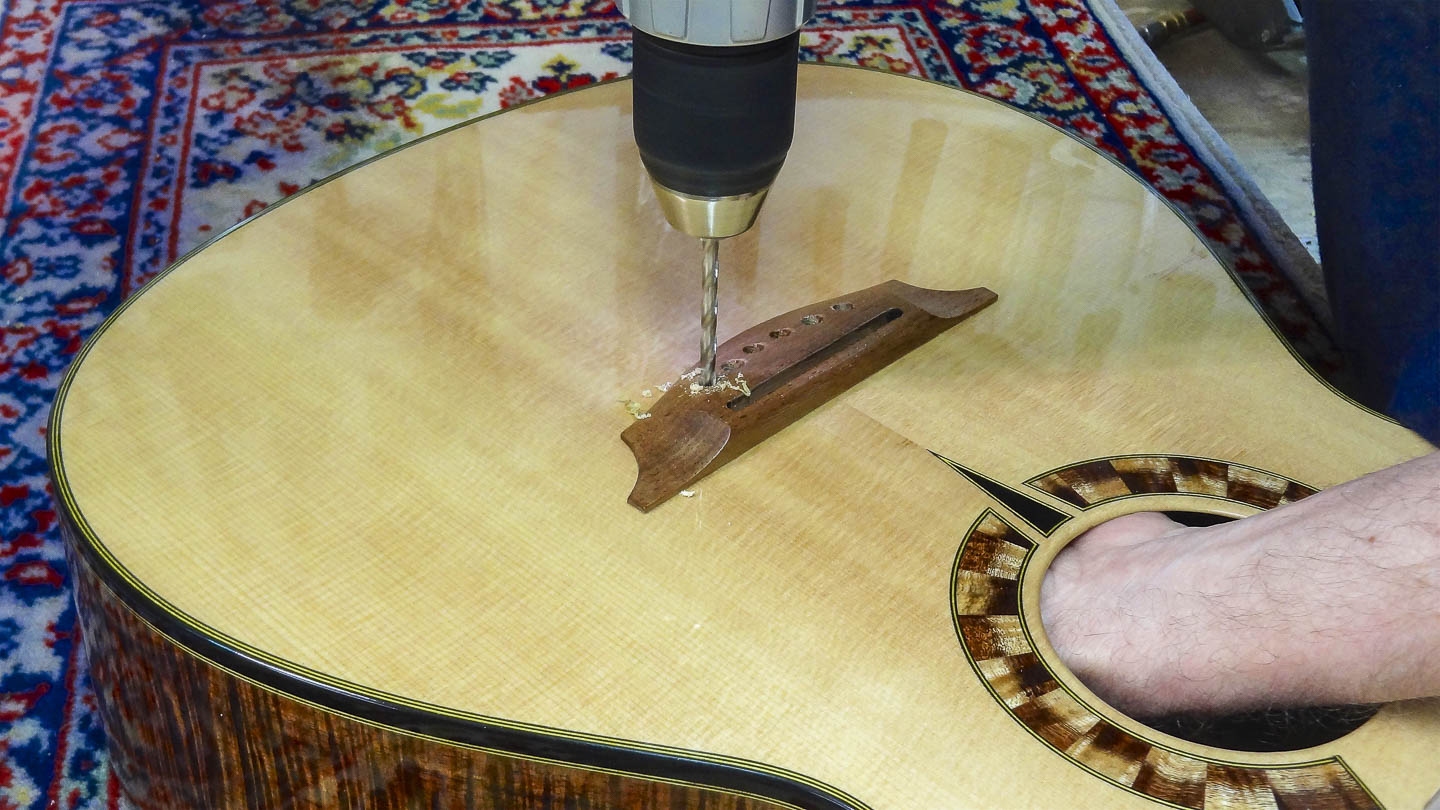
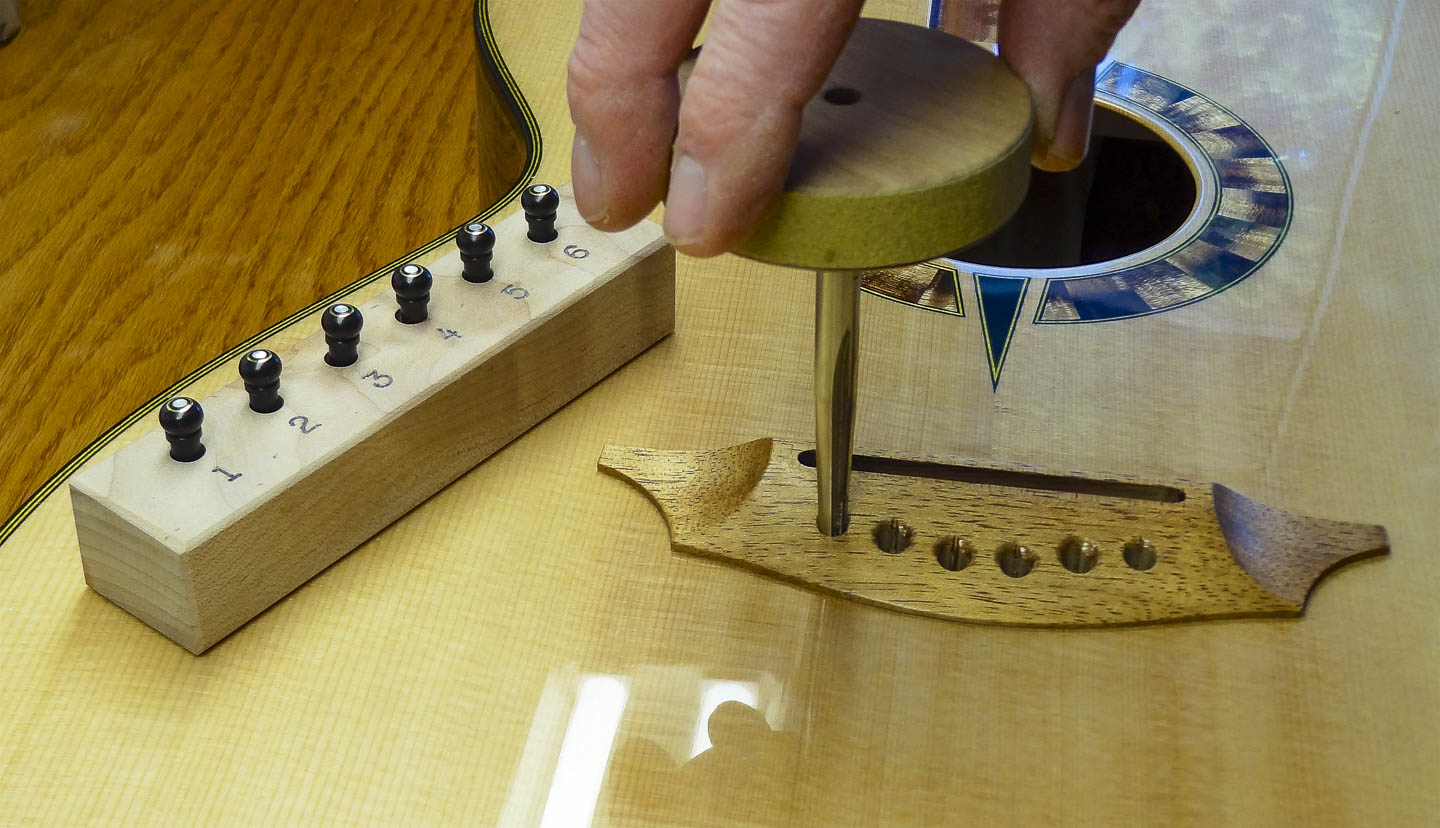
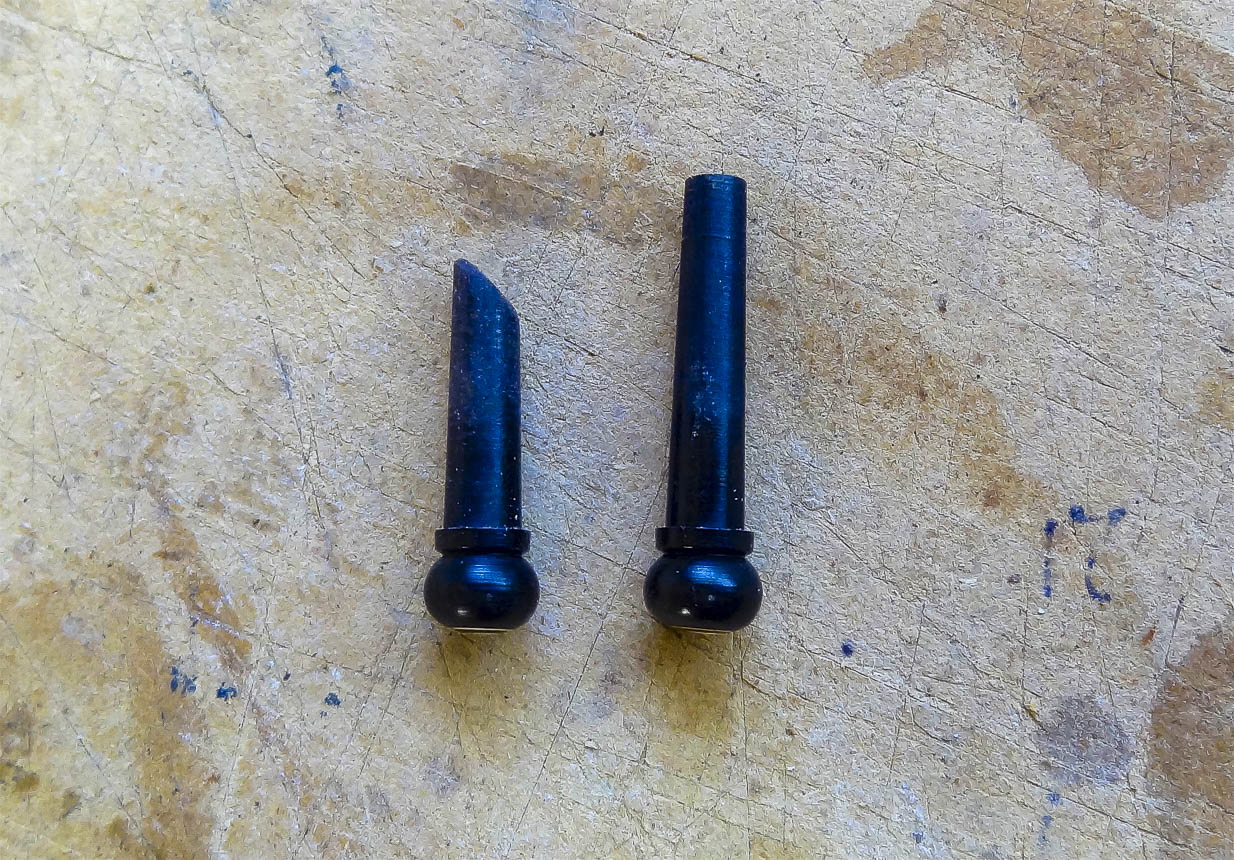
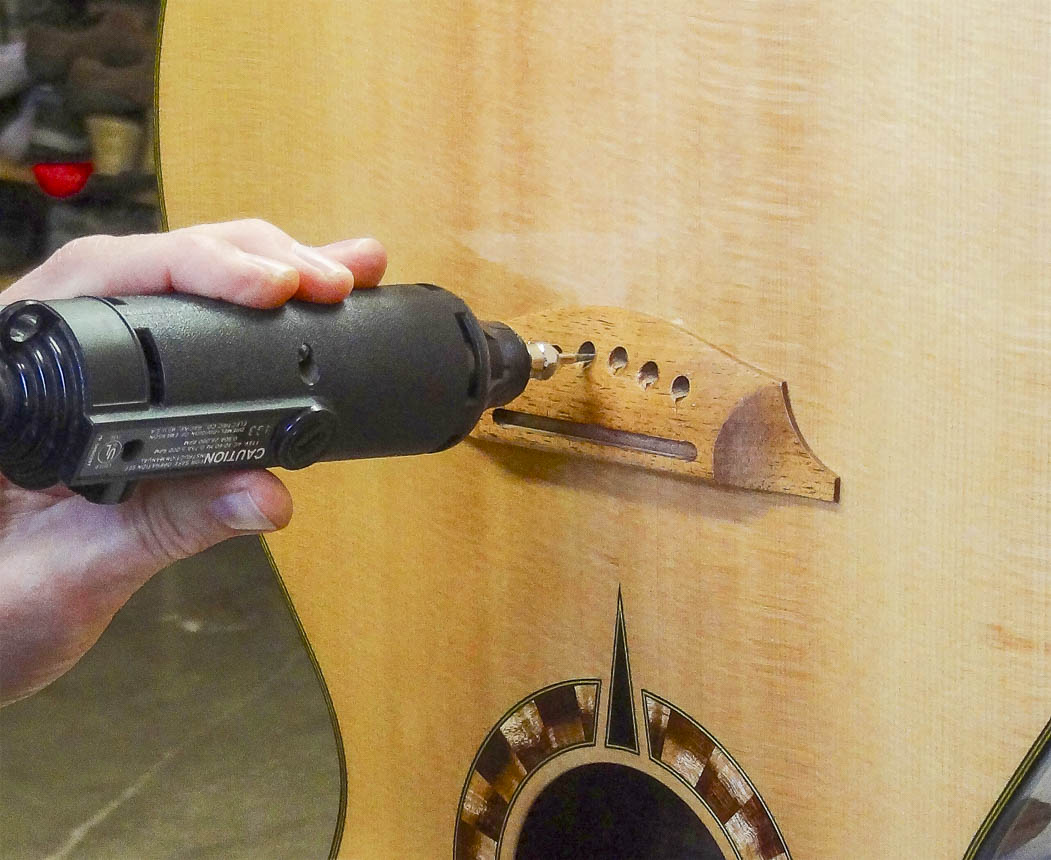
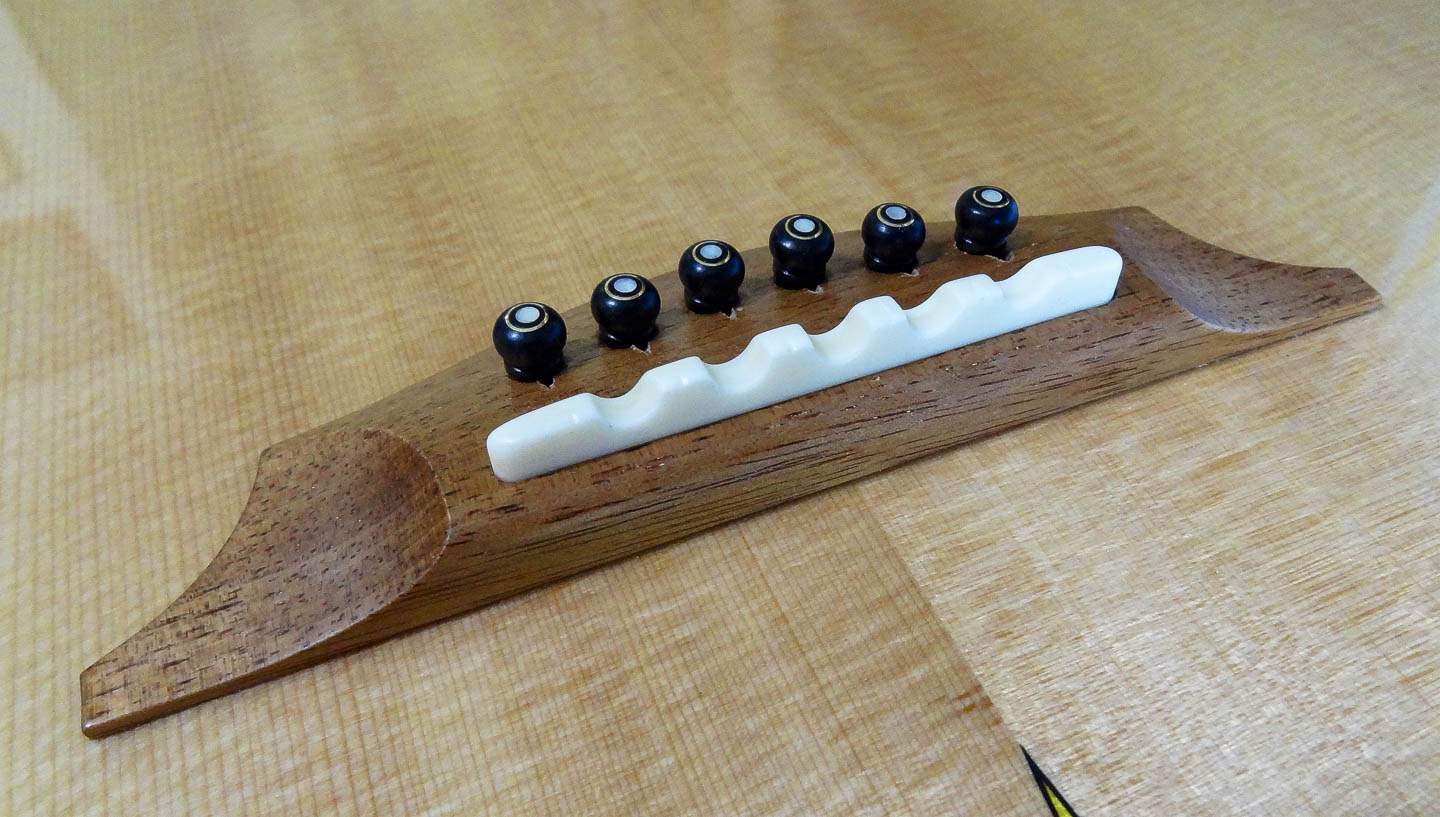
After it’s dry, I use a drill bit to clear glue out of the bridge pin holes and complete the outer two holes through the top. I use a reamer with the appropriate taper to fit the bridge pins. Because each bridge pin can have slight variations in its diameter, I fit each one to its own hole. The pins are much longer than is required so I sand off the ends at an angle which does two things. With the angled side towards the ball end of the string, it guides the ball to the proper position. And most importantly, it reduces the weight just a little more, which leads to a more responsive guitar. I put a number on the angled surface indicating which hole it goes in. I prefer un-slotted bridge pins, so the last step is to use a Dremel with a thin grinding bit to cut the string slots all the way through the top and bridge plate so the strings can slide easily.
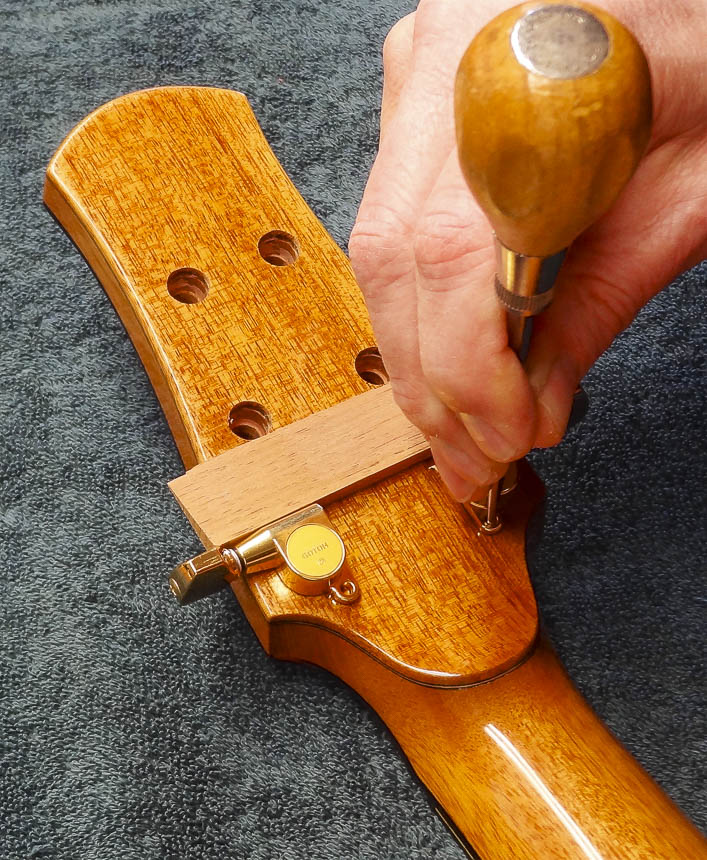
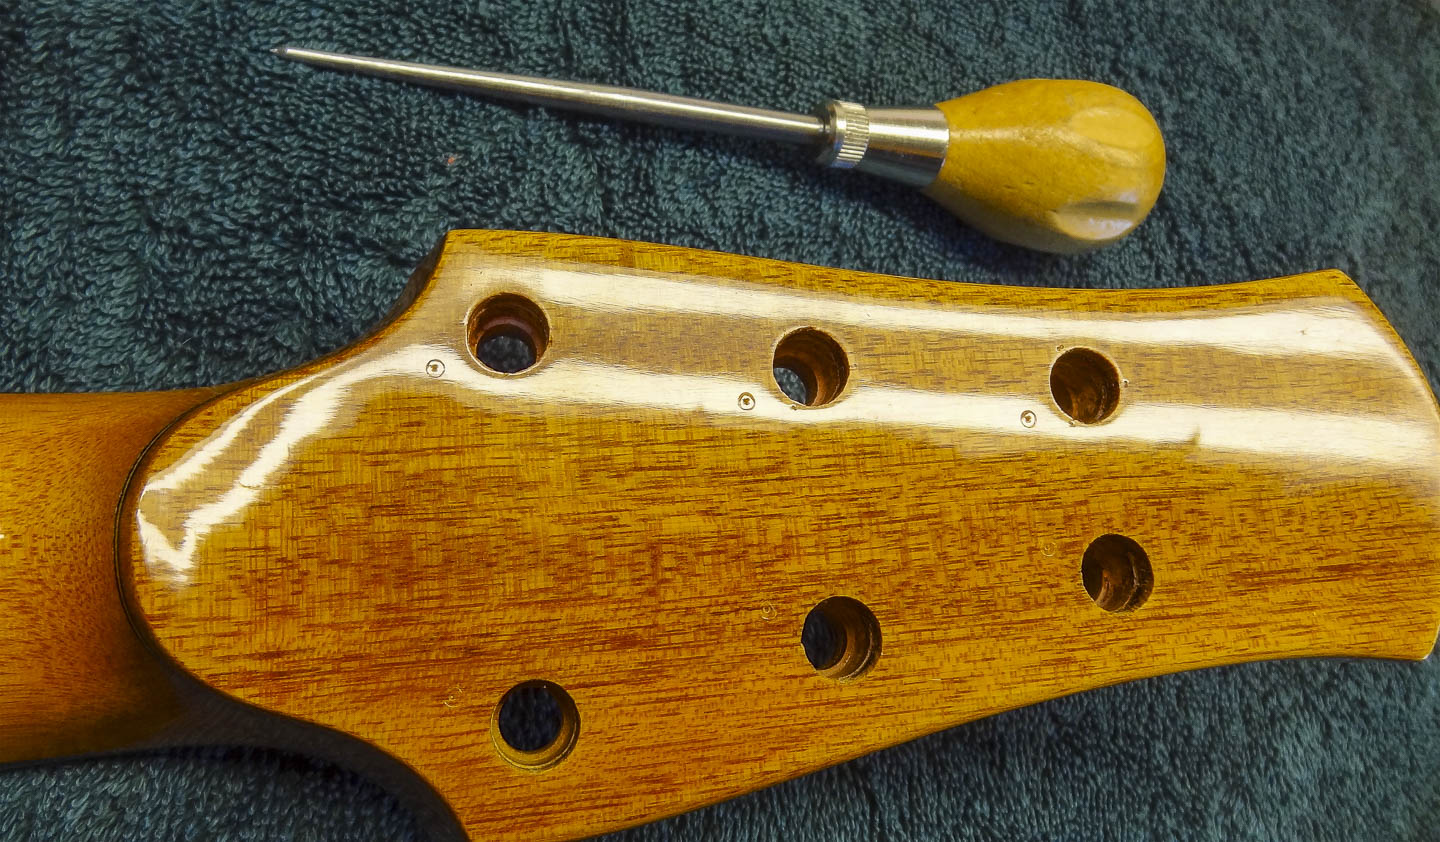
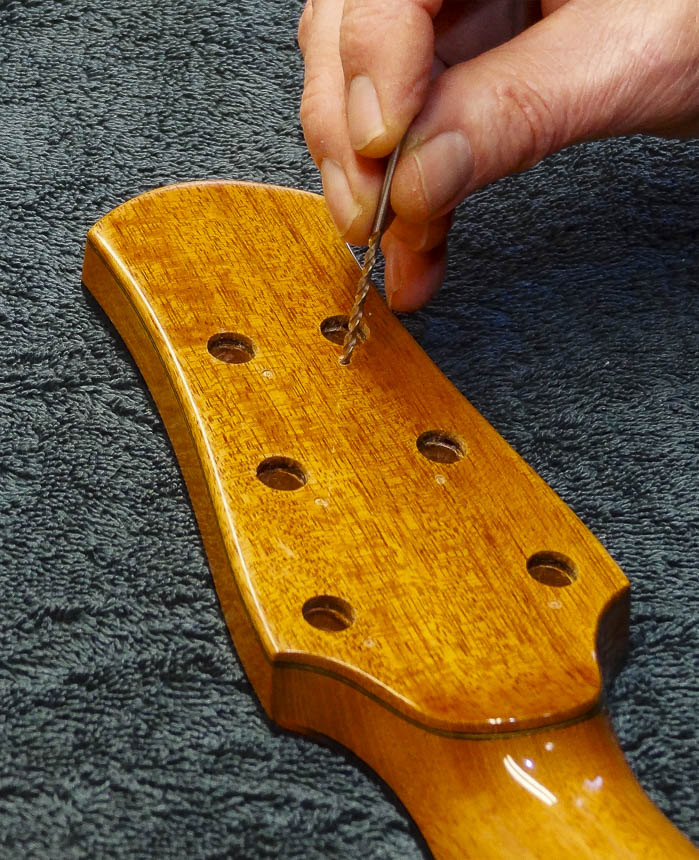
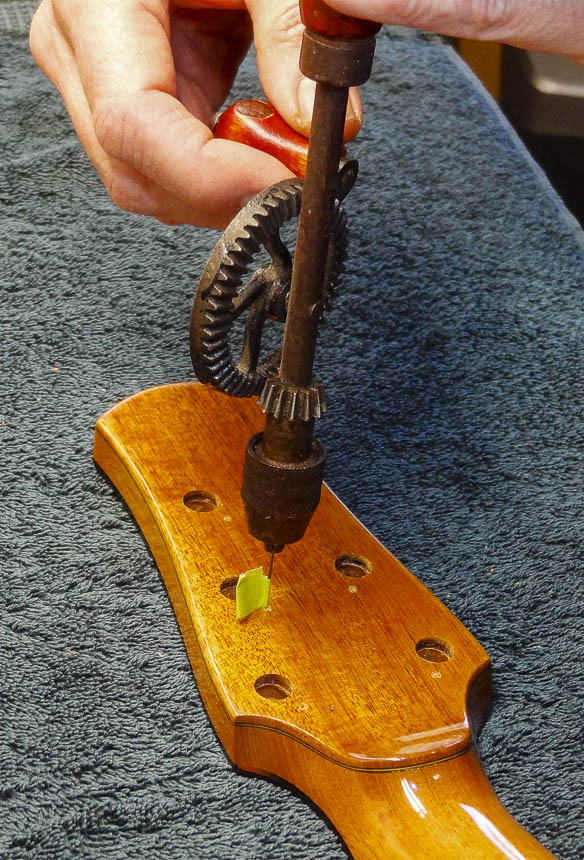
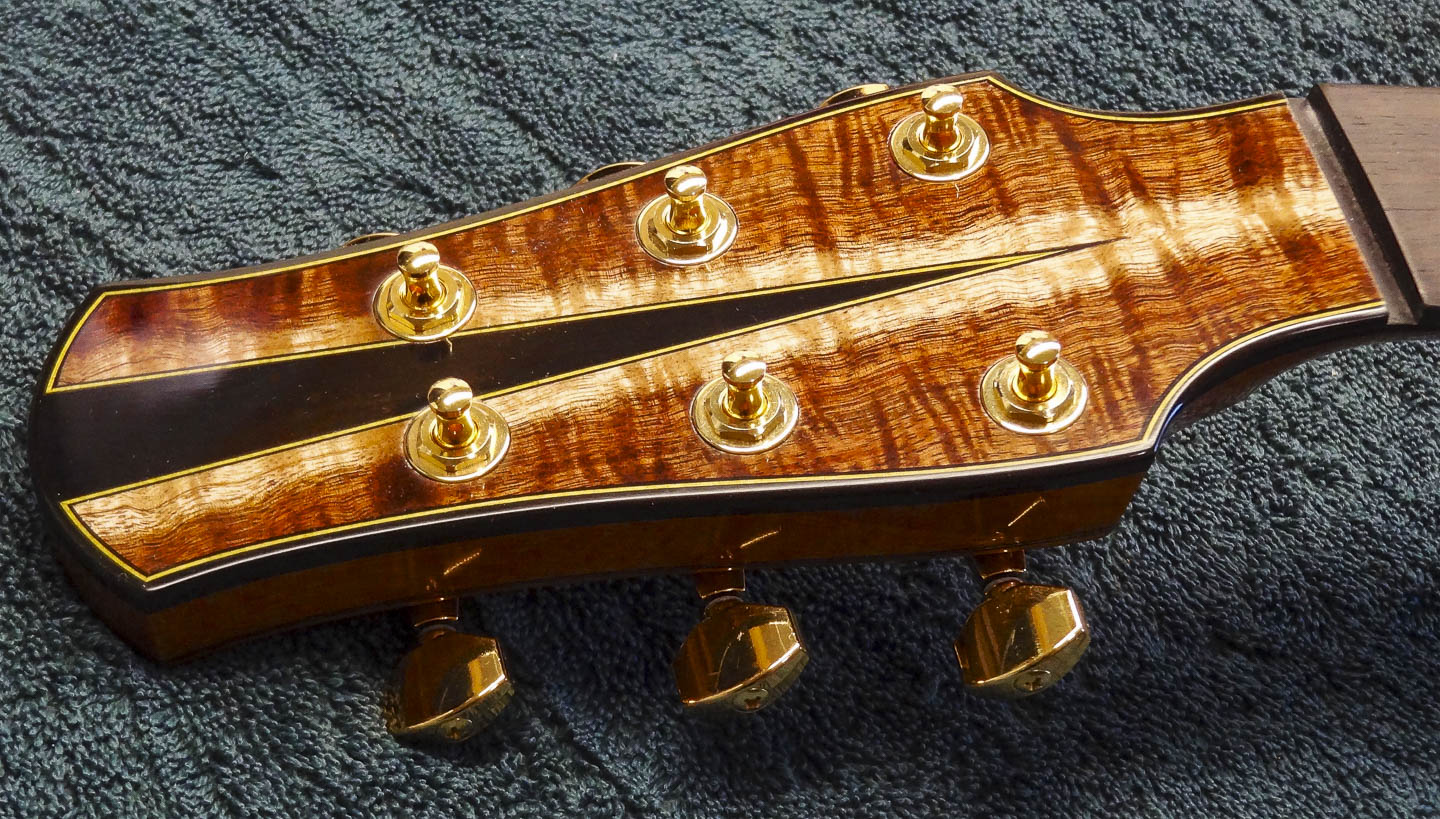
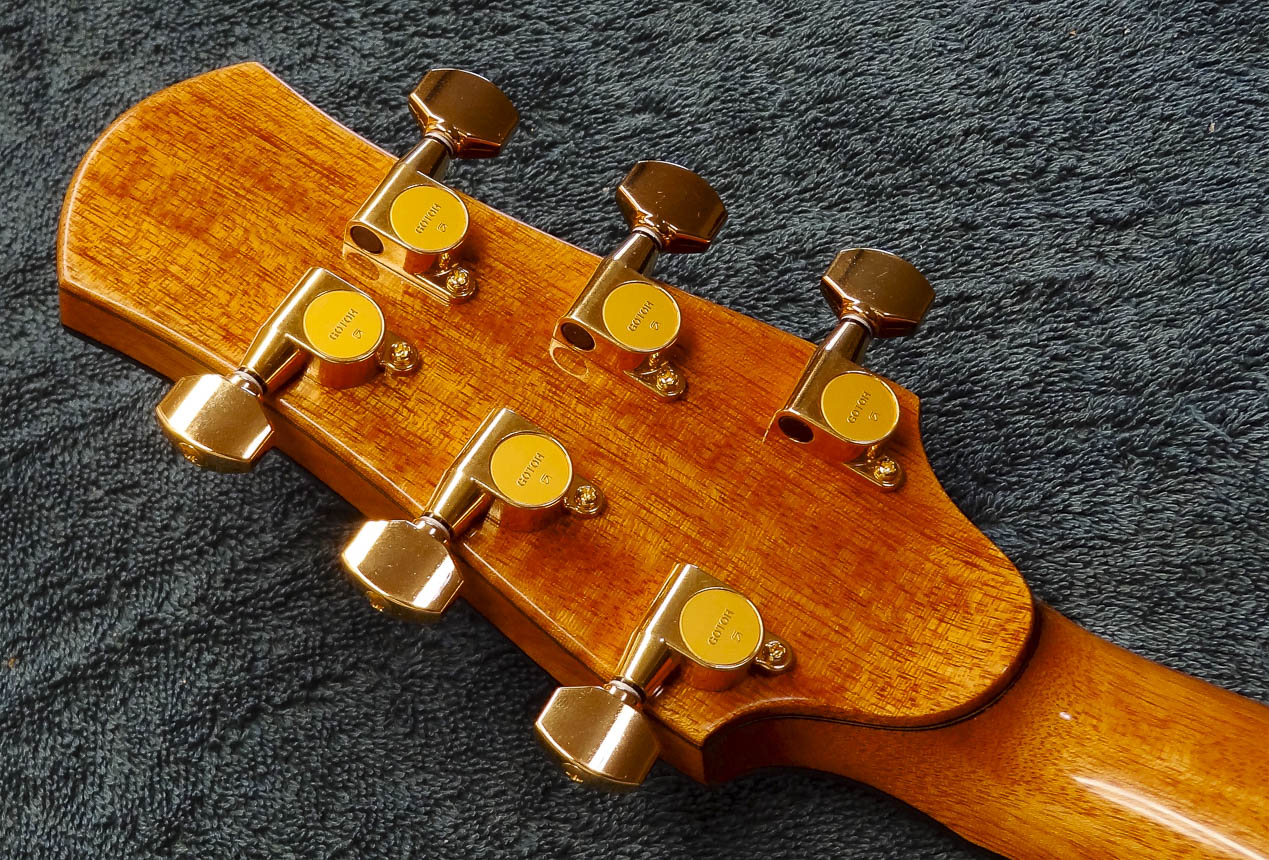
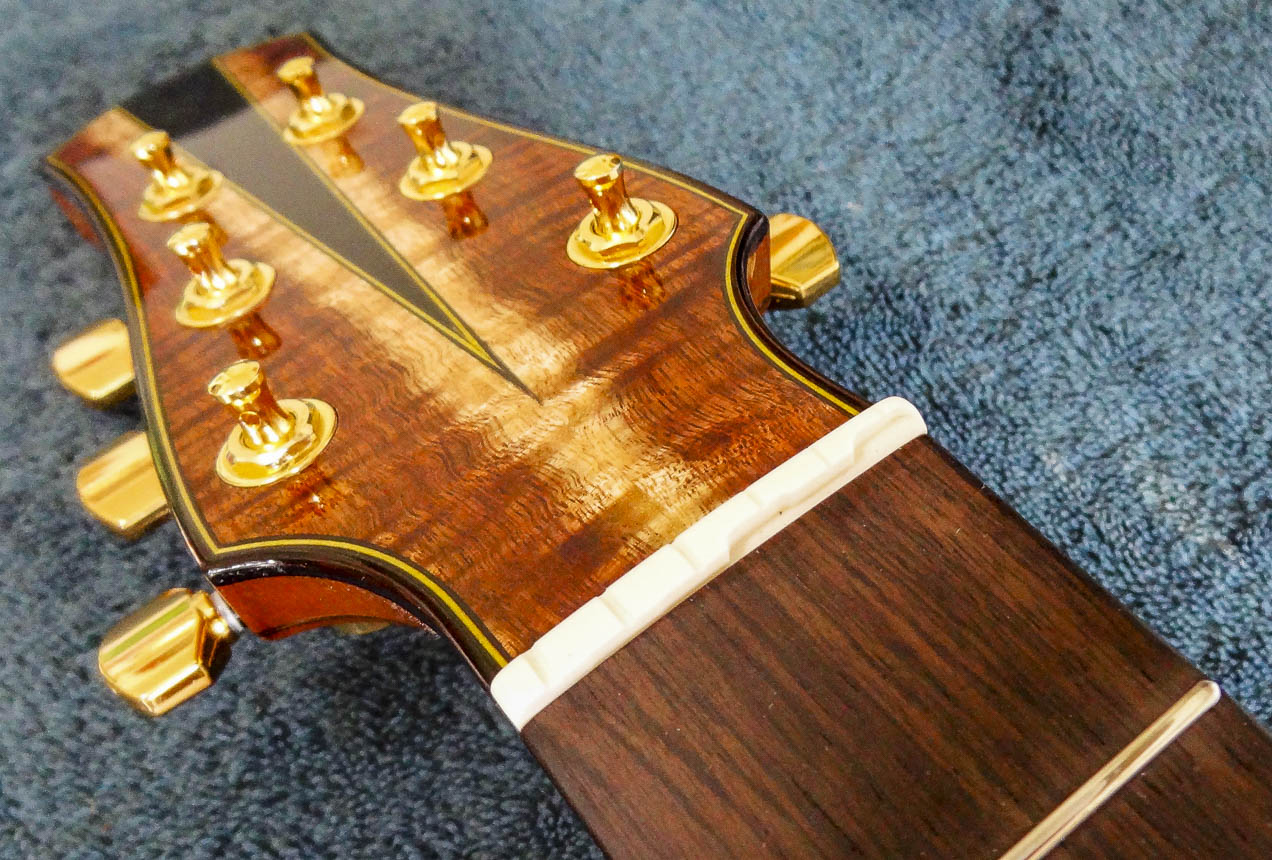
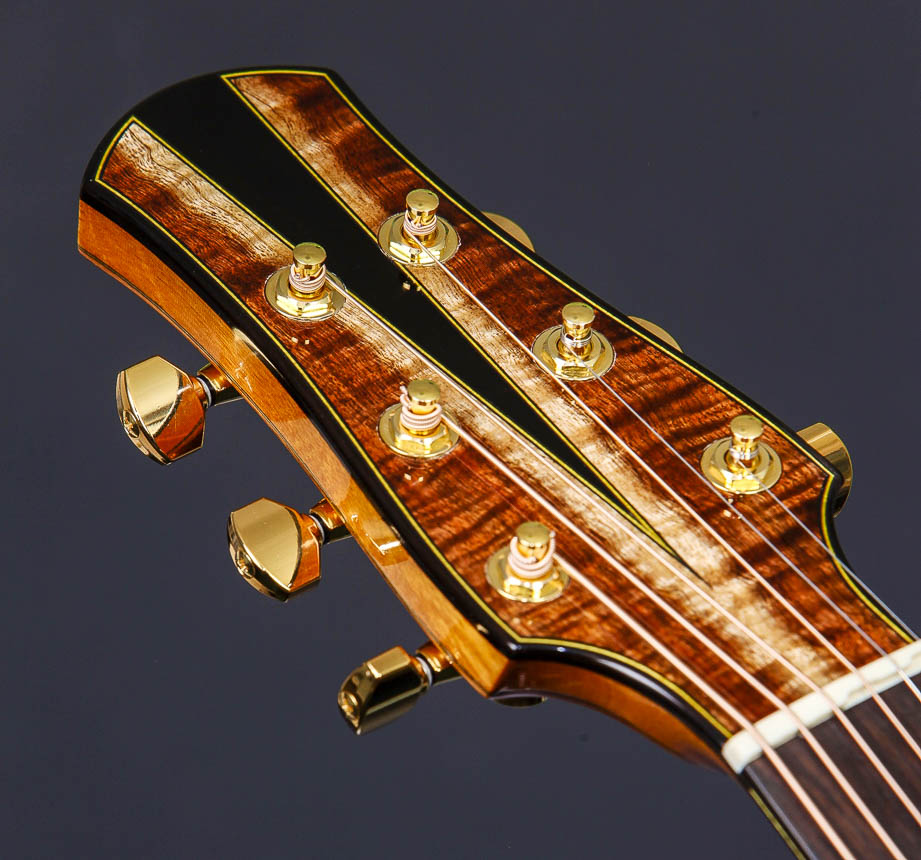
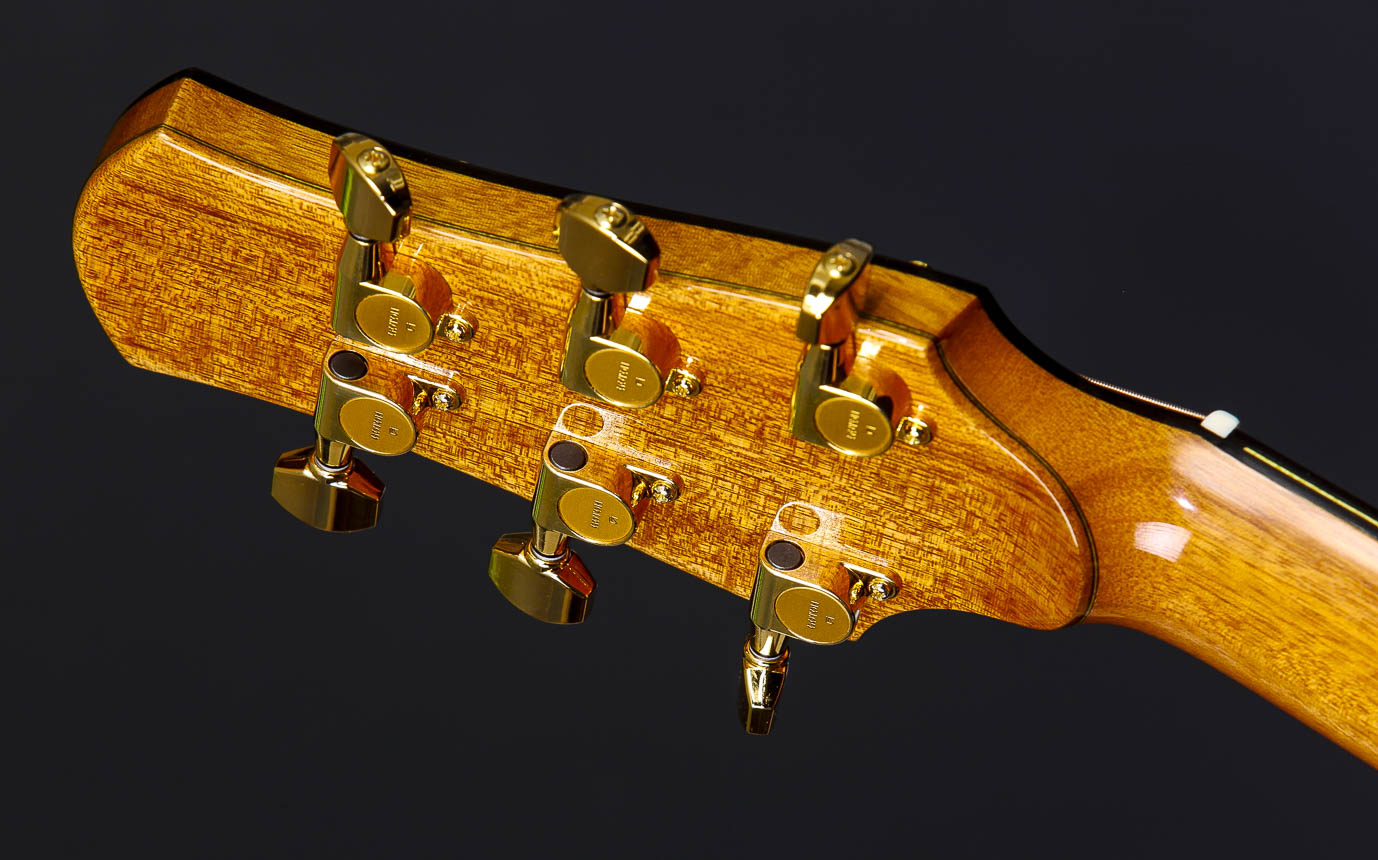
Before the tuners are put on the head stock, the build-up of lacquer needs to be cleaned out of the tuner holes and reamed out of the washer counter sinks. I put tuners on in pares and align them with a flat stick. An awl is used to scribe the position of the screw hole and I use an oversized bit to drill just through the lacquer. If the bit is too small, there’s a tendency for the screw to crack the lacquer as is driven in. A tiny pilot hole is then drilled for the screw and the tuners are put on. These are Master Grade gold tuners that really dress up the head stock, a bit like adding jewelry.
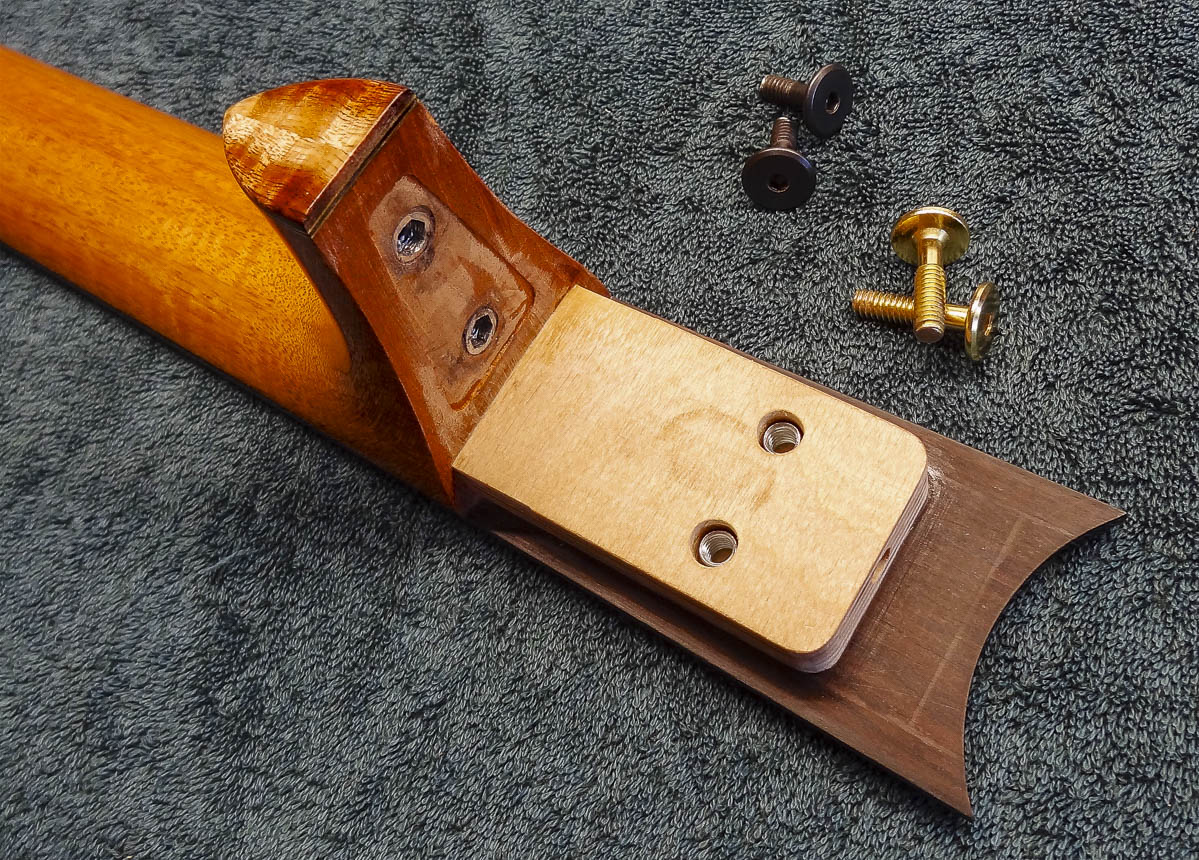
The last thing to do before the set up is to attach the neck with the four bolts. The two that will be seen are nice brass ones.
SET UP & FINAL DETAILS
The set up is very important because it affects the players interaction with the instrument, and how in tune it will play. It involves a number of separate steps:
Fret job
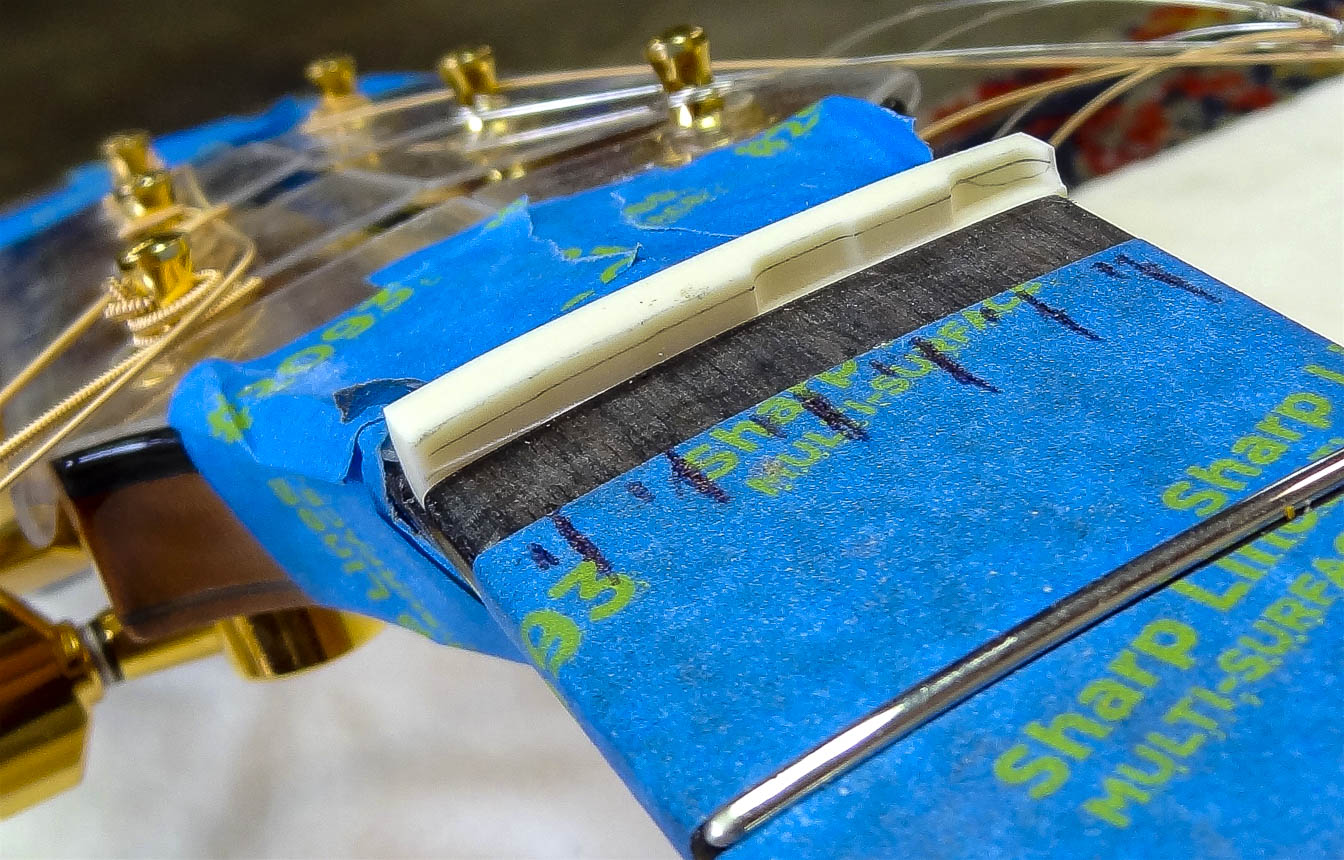
My early effort getting the fret board perfectly level pays off big time. I was rewarded with minimal work to be done leveling the frets. A fret that is higher than its neighbors can lead to string buzz when plucked. I use a fret rocker to check for high frets and I only found two of any concern. I was able to dress them individually and avoided a full-on fret level, which involves using a long sanding beam to level all the frets to each other and then re-crowning them with a special file. As it is, I just fixed the two high ones and then sanded all the frets and fret board through progressively finer grits, finishing the frets with a polishing pad. Sometimes you just live right.
Neck relief
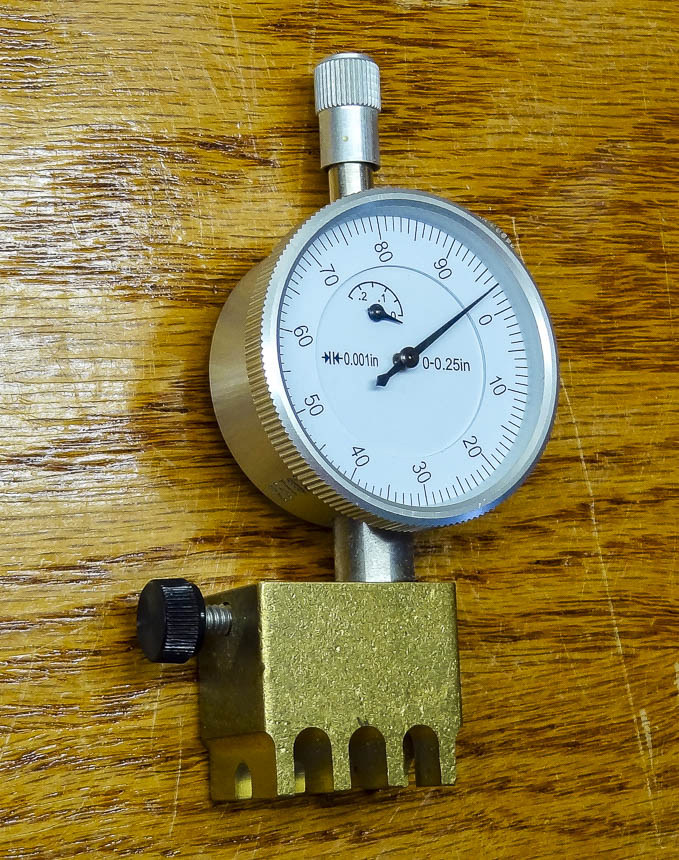
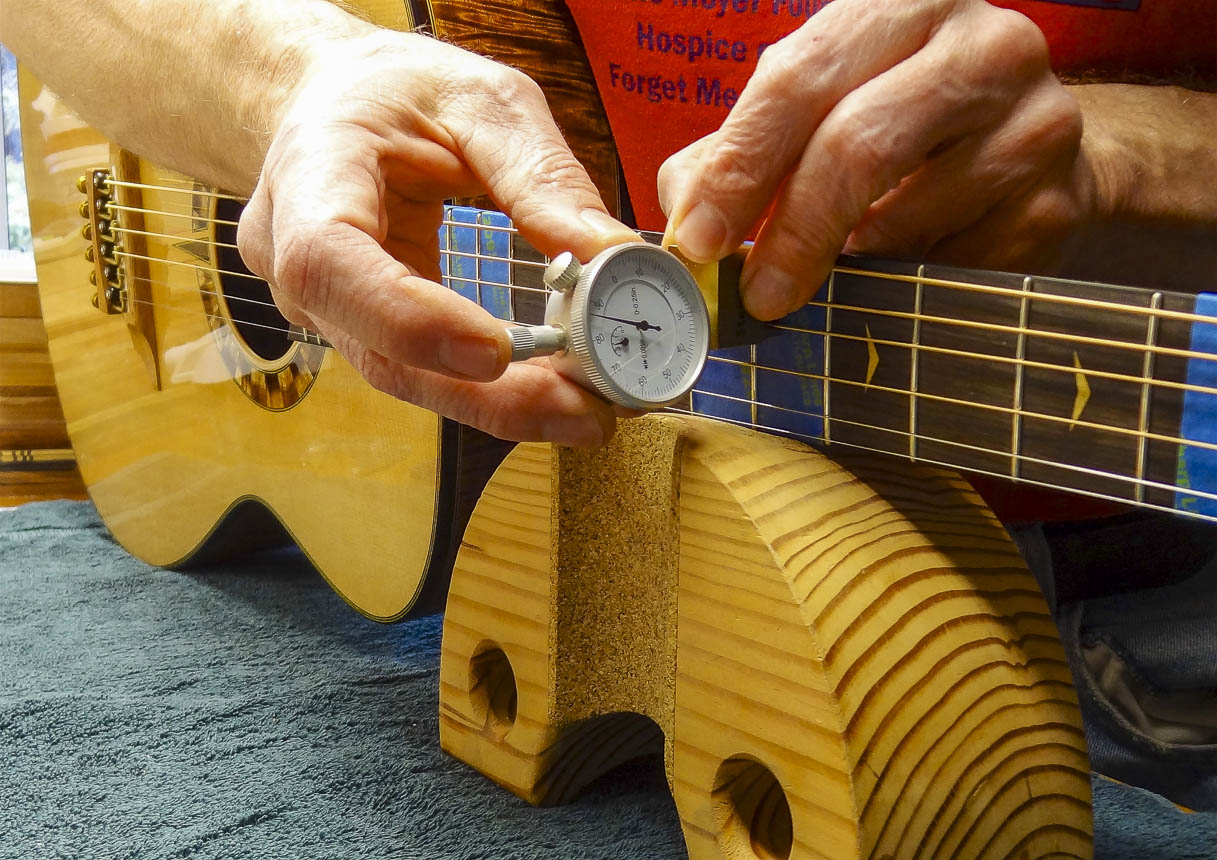
I use a slightly convex shape along the length of the fret board called relief, it’s lower in the middle. This helps prevent string buzz. Not all players want relief, but most do. I use a tensioned string to measure it by setting a capo on the first fret, holding the string down to the 14th fret, then use a dial gauge positioned half way between these two points to see how far the string moves before it touches the fret below it. This needs to be done with all the strings on and brought up to concert pitch, which puts tension on the neck. The relief is adjusted with the truss rod, which is buried in the neck. A wench goes in through the sound hole and turning it one way or the other bends the truss rod and neck. I set the relief on this guitar to .006”. That’s not much, but it makes a difference on how well the guitar plays.
Determine saddle compensation points
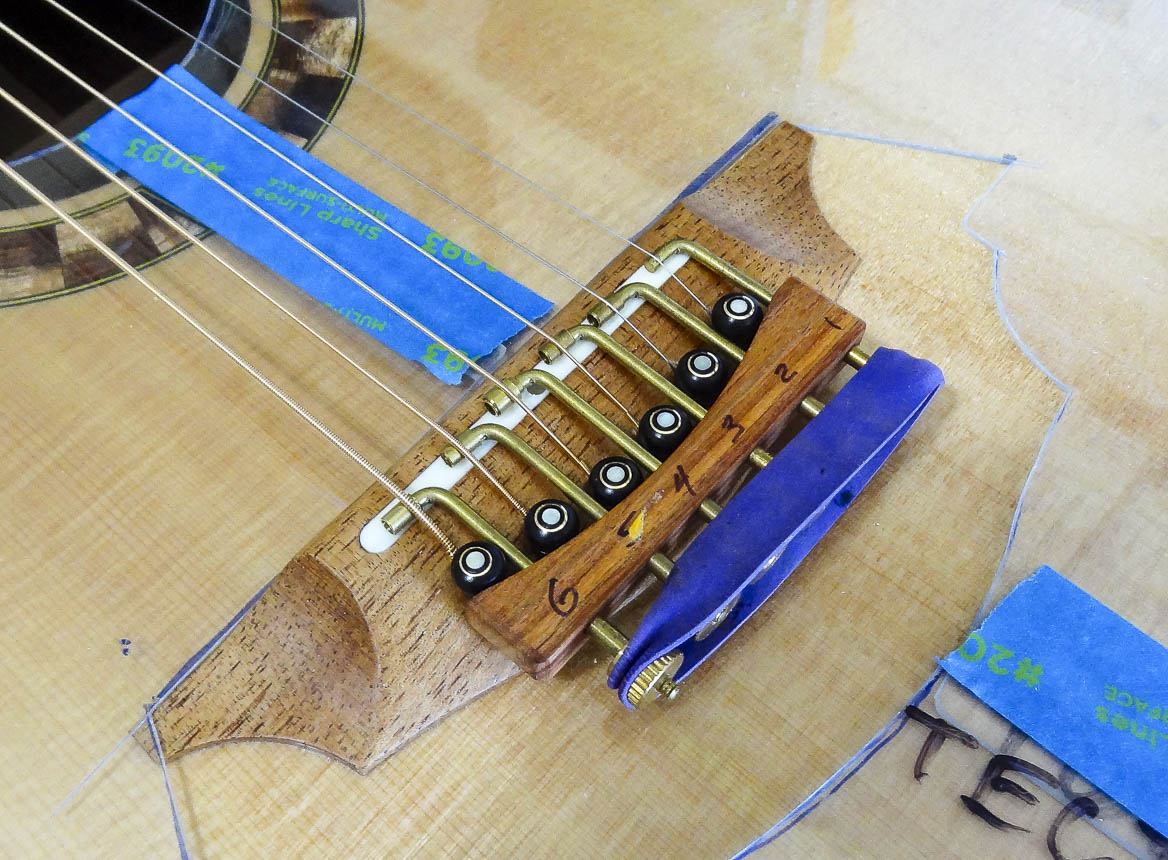
This is called intonation, or getting the guitar to play in tune. You can read more about this on the PHILOSOPHY page. I combine both nut and saddle compensation for optimal intonation, which is a much more involve process than on most guitars with saddle only compensation. I use an adjustable “saddle” that allows me to change the contact point of the strings fore and aft relative to the fret board. For each string I adjust the tuning machine until the 2nd fret plays in tune. Then I move up an octave and see if the 14th fret plays in tune. If it’s sharp or flat I move the adjustable “saddle” until both notes play in tune. The adjustable “saddle” rests on a temporary bone saddle used only for the set up, it’s level with the top of the bridge. Once all the strings have been adjusted as described, I mark the intonation points on top of the set up saddle. I will use these measurements to file the real saddle’s intonation points.
Determine nut compensation points
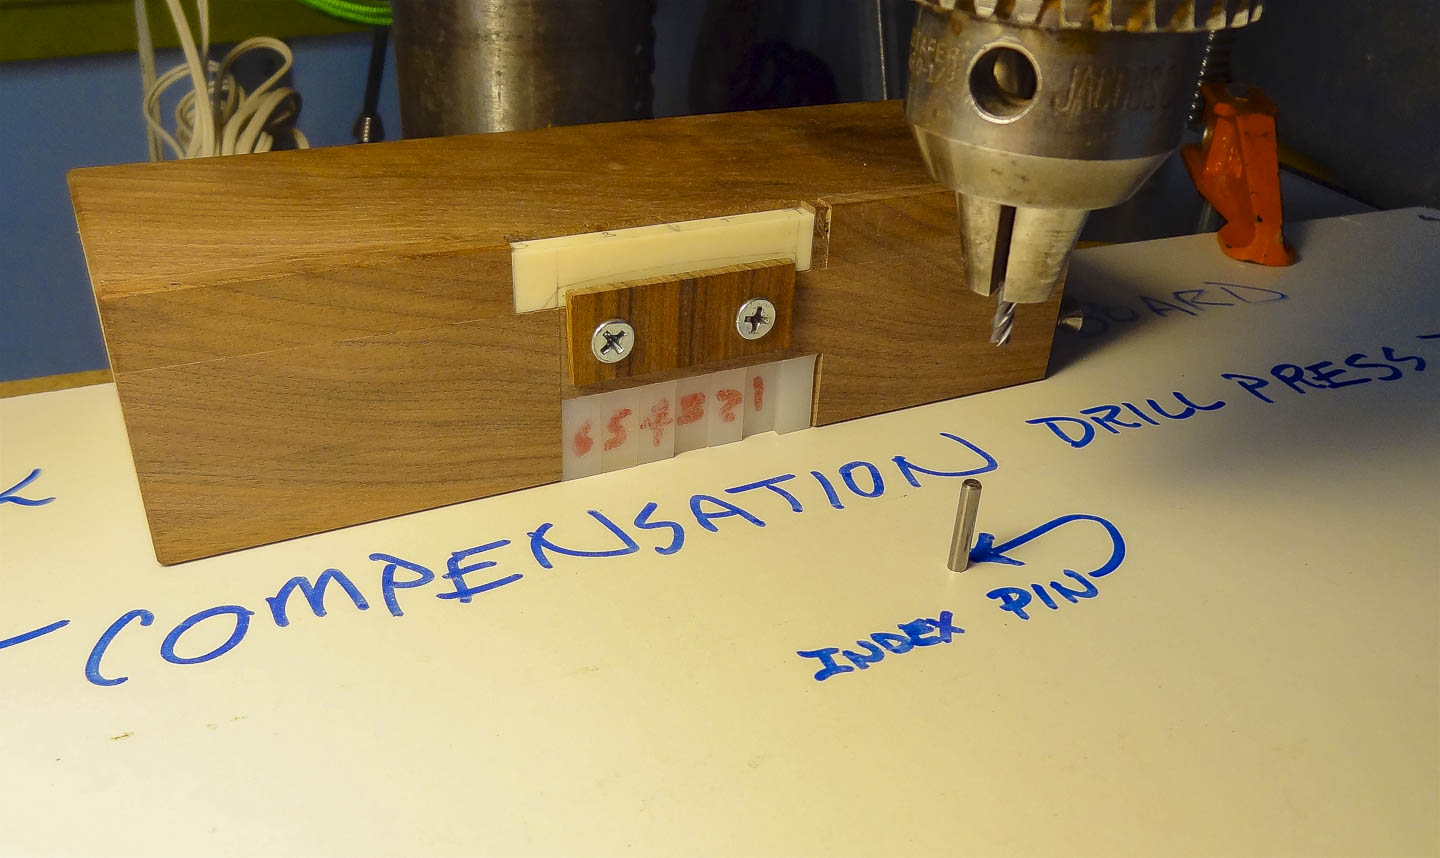
With the frets playing in tune, now I need to get the open strings playing in tune. I do this by compensating the nut. I have a set up nut that is only as high as the playing surface of the fret board. I use a very thin bone shim placed between the set up nut and the strings, then slide it fore and aft as necessary until each open string plays in tune. If you remember, I made the distance between the nut and the 1st fret 3 millimeters too short. Here is why. Once I have the thin shim placed correctly, I measure how far back it is from the front edge of the set up nut, and that is my compensation point; the 3 millimeters is more than enough to work within. I will use those measurements for each string to set up my nut compensation milling jig.
Fit, compensate and slot the nut for strings. Fit the saddle
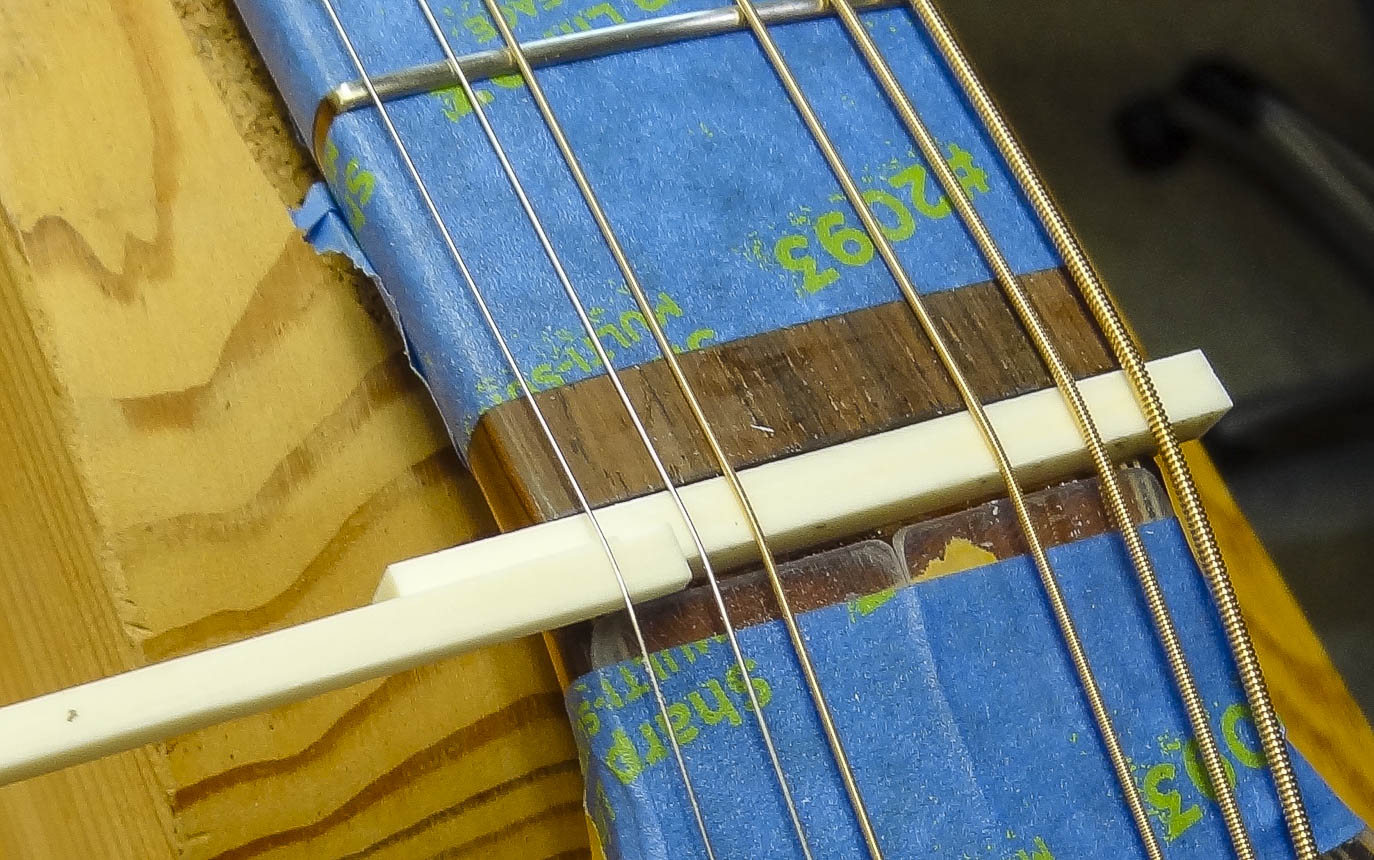
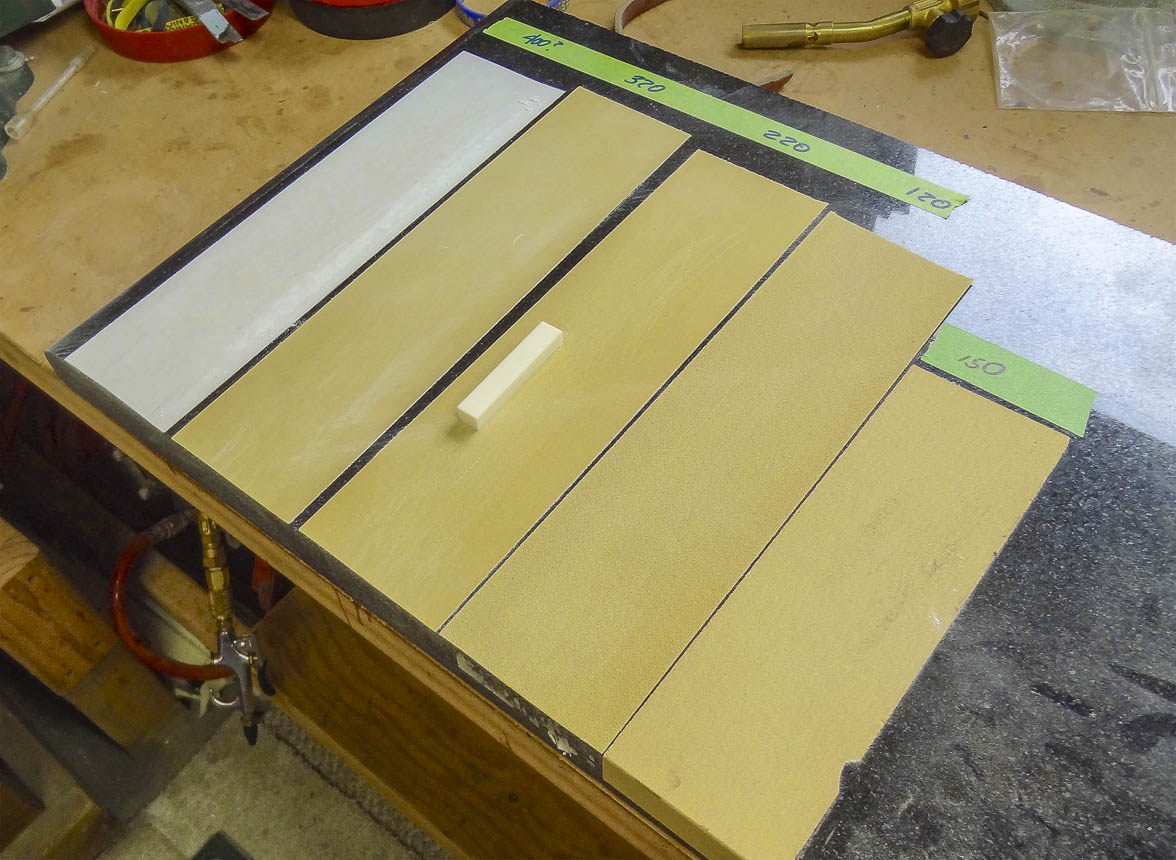
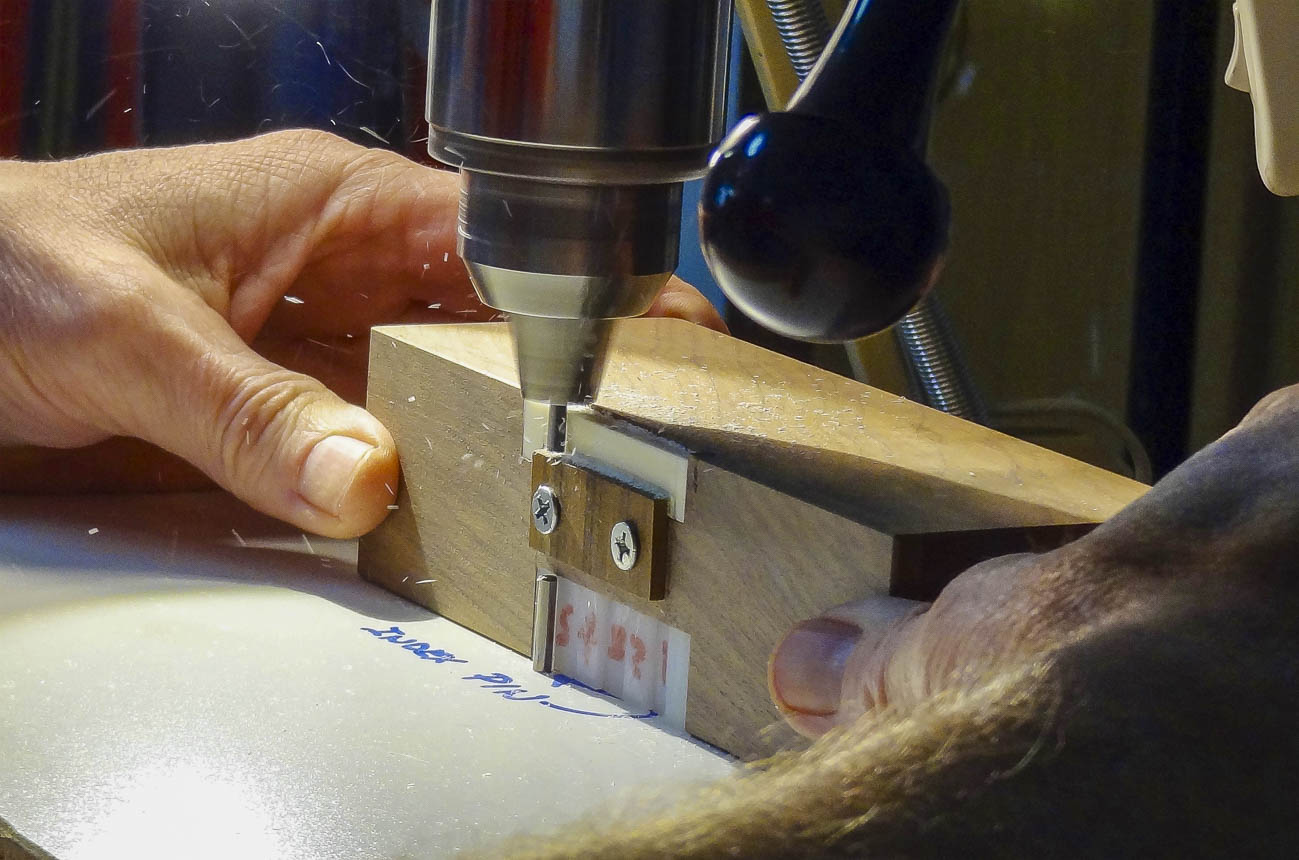
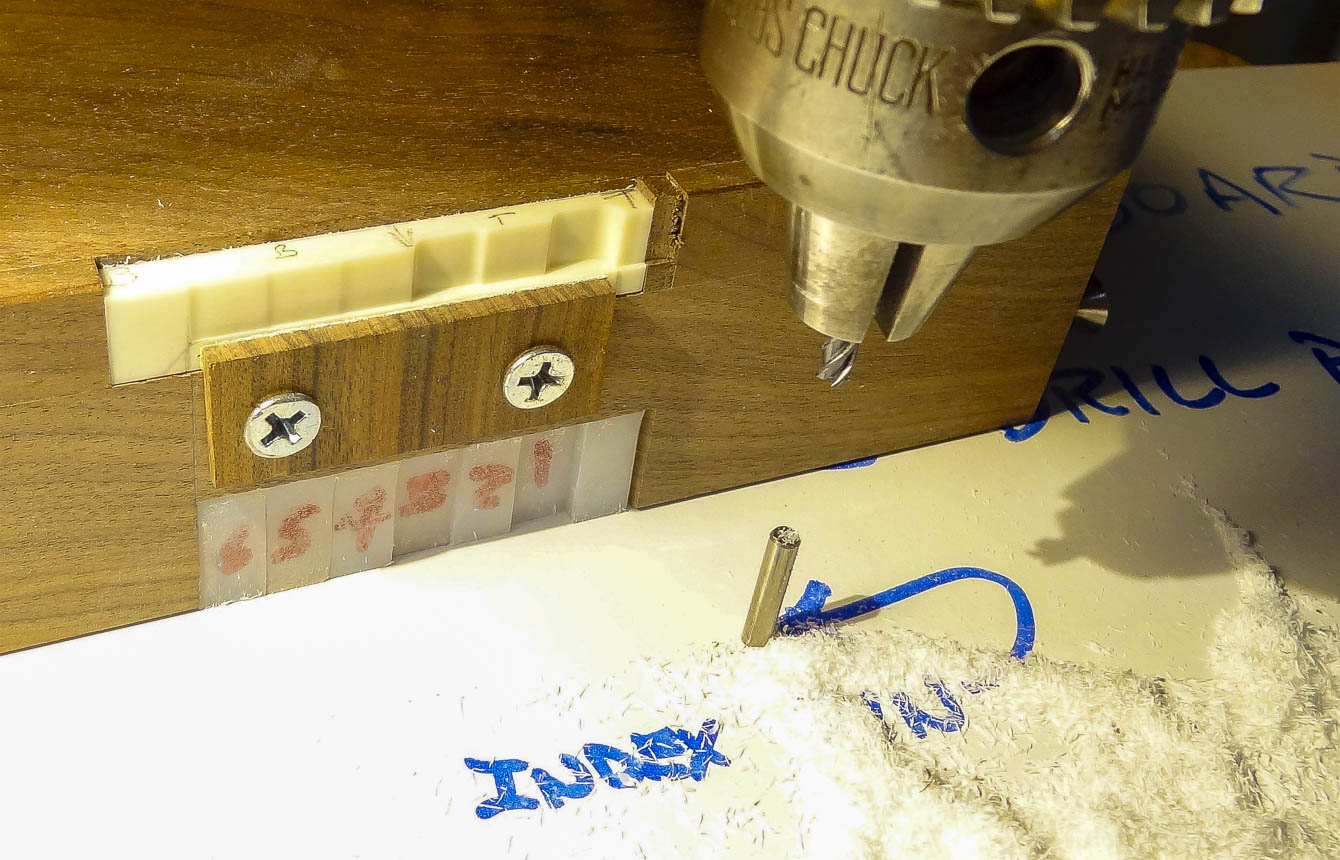
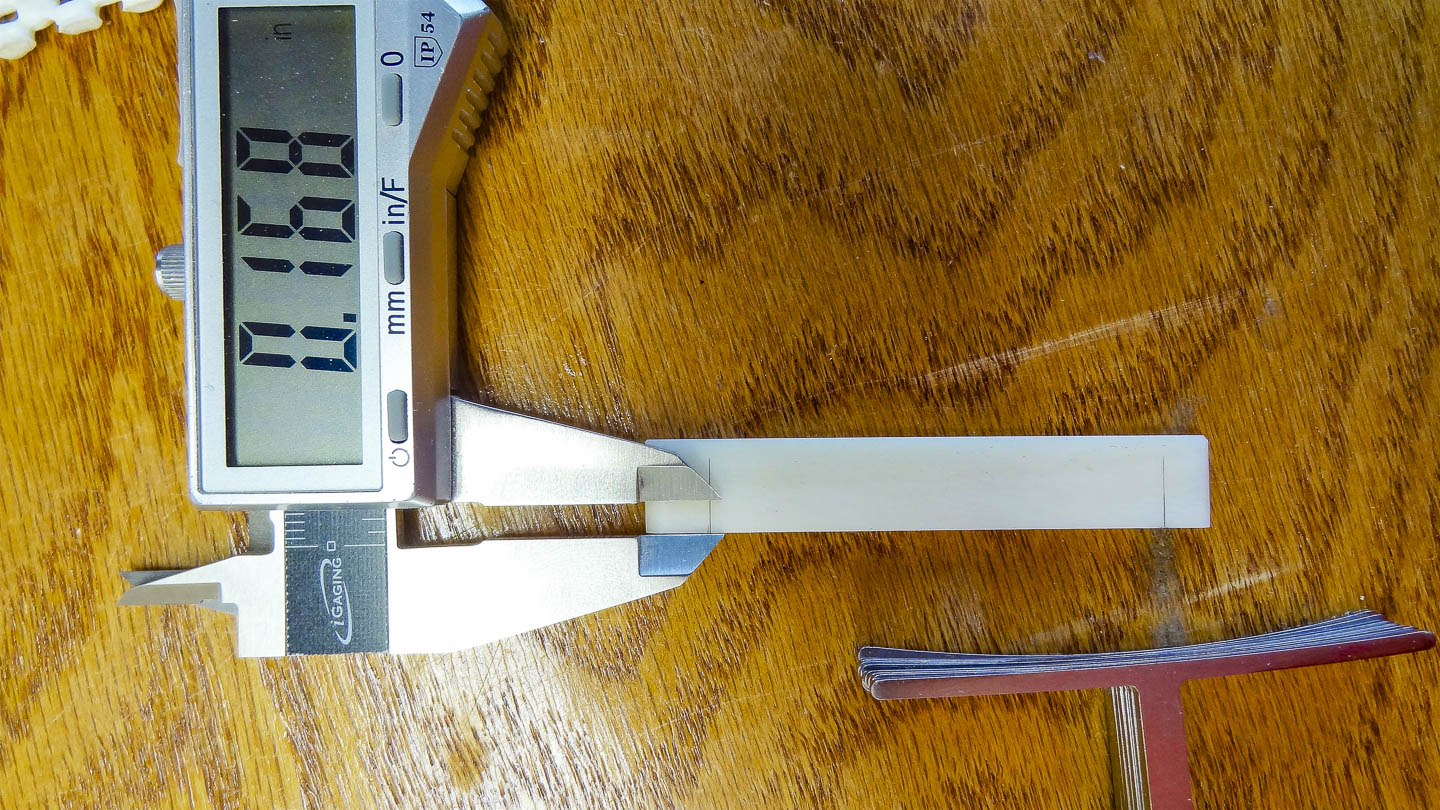
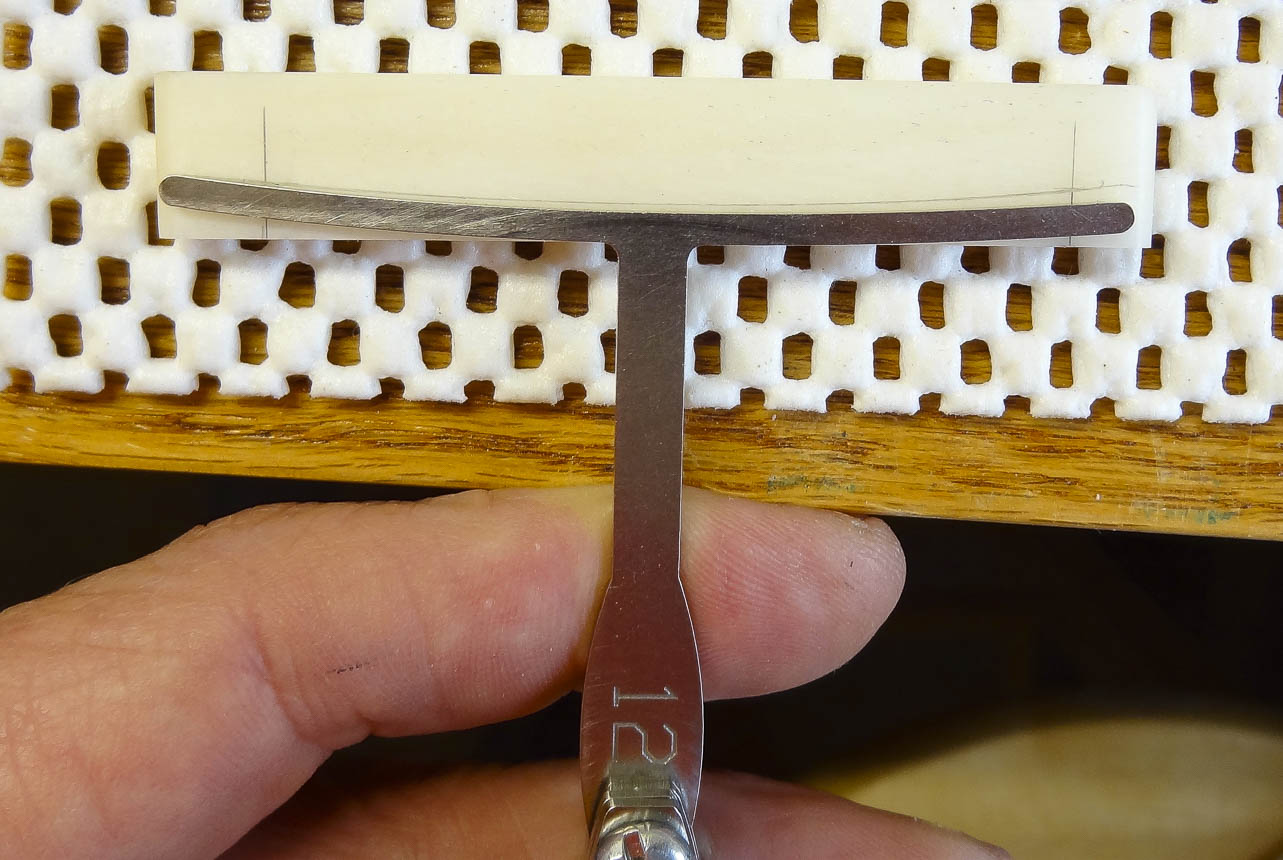
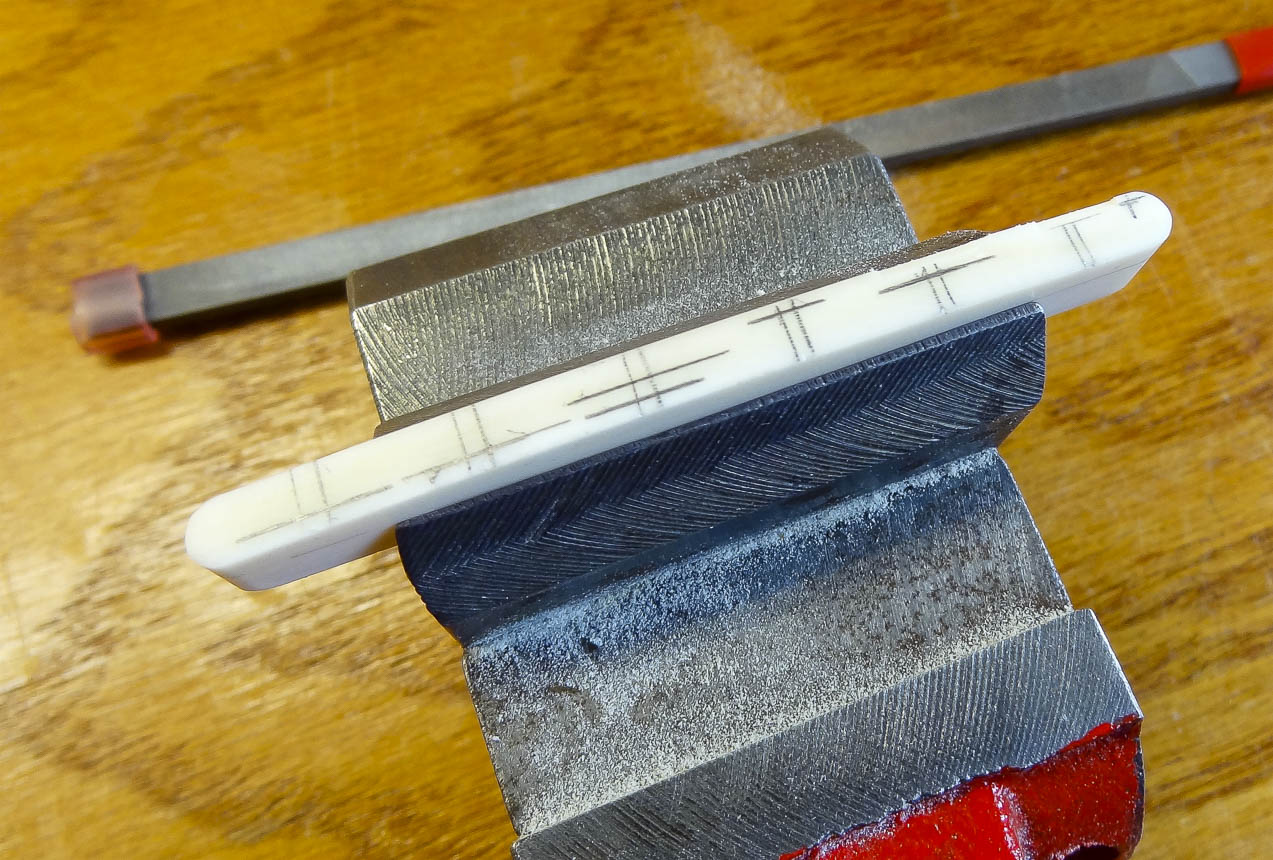
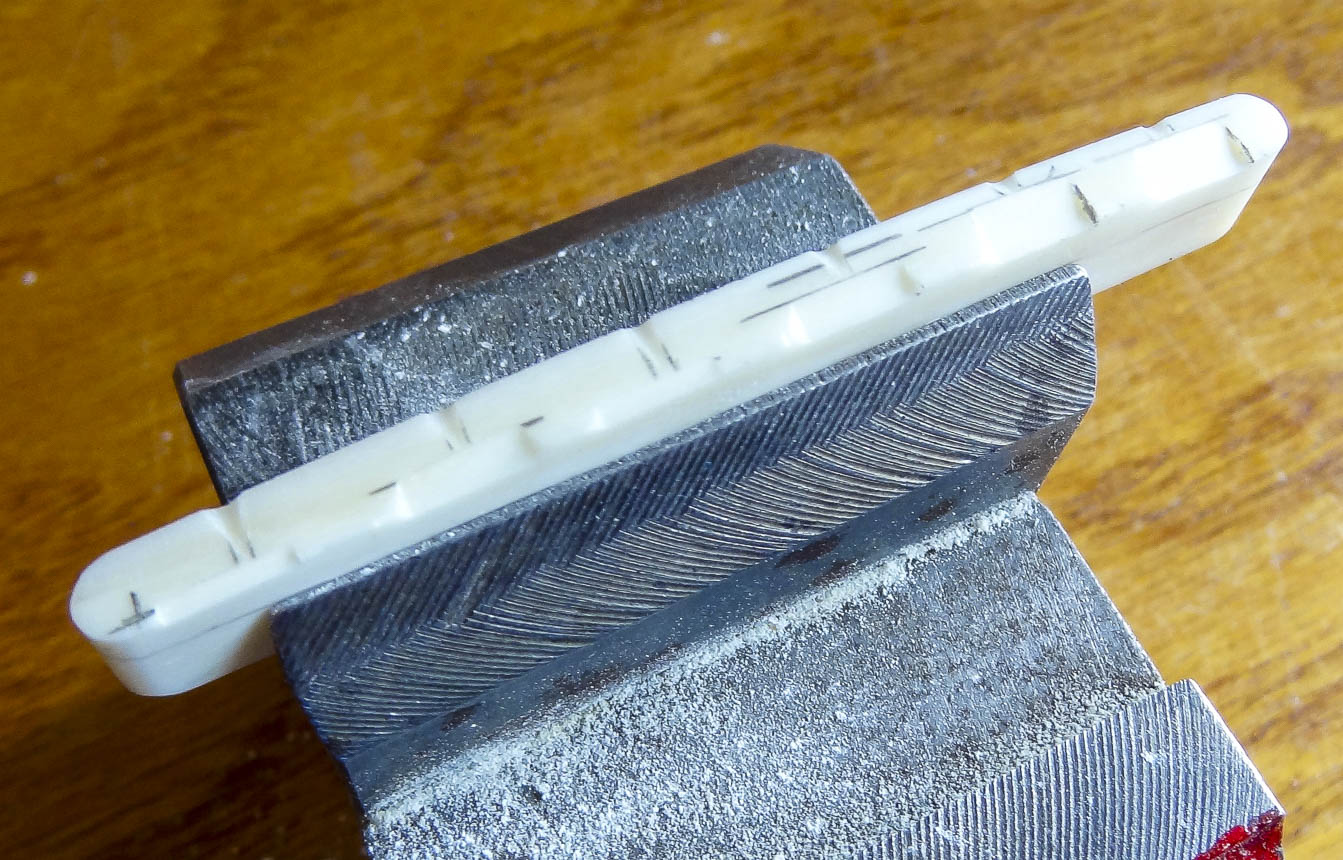
The nut and saddle blanks are both made of cow bone and are over sized in all dimensions. I use progressively finer grits of sand paper stuck to a very flat granite slab to fit them to their respective slots, ending with 1800 grit for a nice polish. The saddle is slightly more complex because it’s completely housed in the saddle slot of the bridge and has rounded ends. The nut slot is open on each end, so the nut just needs to be cut to the right length. Once the nut fits in the slot, I use a jig that has steps adjusted to my determined compensation points and mill the nut on a drill press. With the nut in place on the neck, I use a pencil sanded in half to span the first two frets and draw a guide line for filing the string slots to depth. I sand the excess off the top of the nut and use a string spacing ruler to define the spread of the strings. The guitar is strung up once more and I use files that are gauged to individual string sizes to create slots for the strings to ride in. This is just preliminary to get close, final depth will be completed at the end of the process.
Set initial string action with the saddle
String action is the distance you have to depress the strings before they touch the frets. For most people, a guitar with great playability has the lowest action possible without leading to string buzz. Action is measured at the halfway point of the string spread, or 12th fret. The guitar is strung up with the newly fitted rough saddle blank in the bridge and I use the dial gauge to measure the action of the 1st and 6th strings. It’s way too high at this point, so using a simple formula, I determine the amount I need to remove from the saddle to bring the action down to where it needs to be. I mark where the two outer strings cross the saddle and take it out of the bridge. I mark the figured amount on the face of the saddle for both strings and use a fret board radius gauge to draw a line connecting the two points, then sand down to the line, restring the guitar and check the action. It’s apt to be a little high, but I’ll take care of it later.
File compensation point on the saddle
I use the previously derived compensation values to mark and file the compensation points on the saddle, and create shallow slots on the back side of the saddle to help guide the strings toward the bridge pin holes. On this build, I also used a round file to create deep scallops between each string. I finish up the saddle with fine sand paper.
Fine-tune the nut string slots
With the action close to it’s final setting, I return to the nut and file the string slots to their final depth. I do one final check of the string action, and if it needs to be lowered I sand the bottom of the saddle the appropriate amount so it sits lower in the slot. Finally, I polish the nut and saddle to their finished condition.
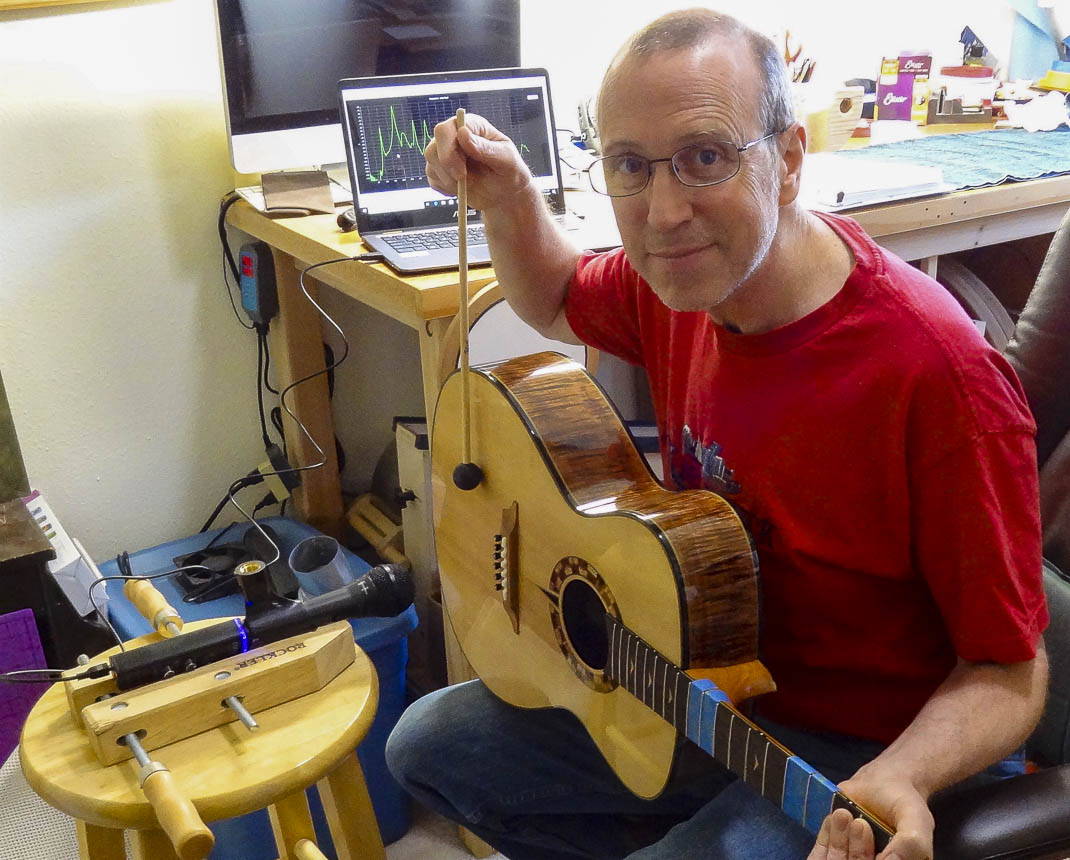
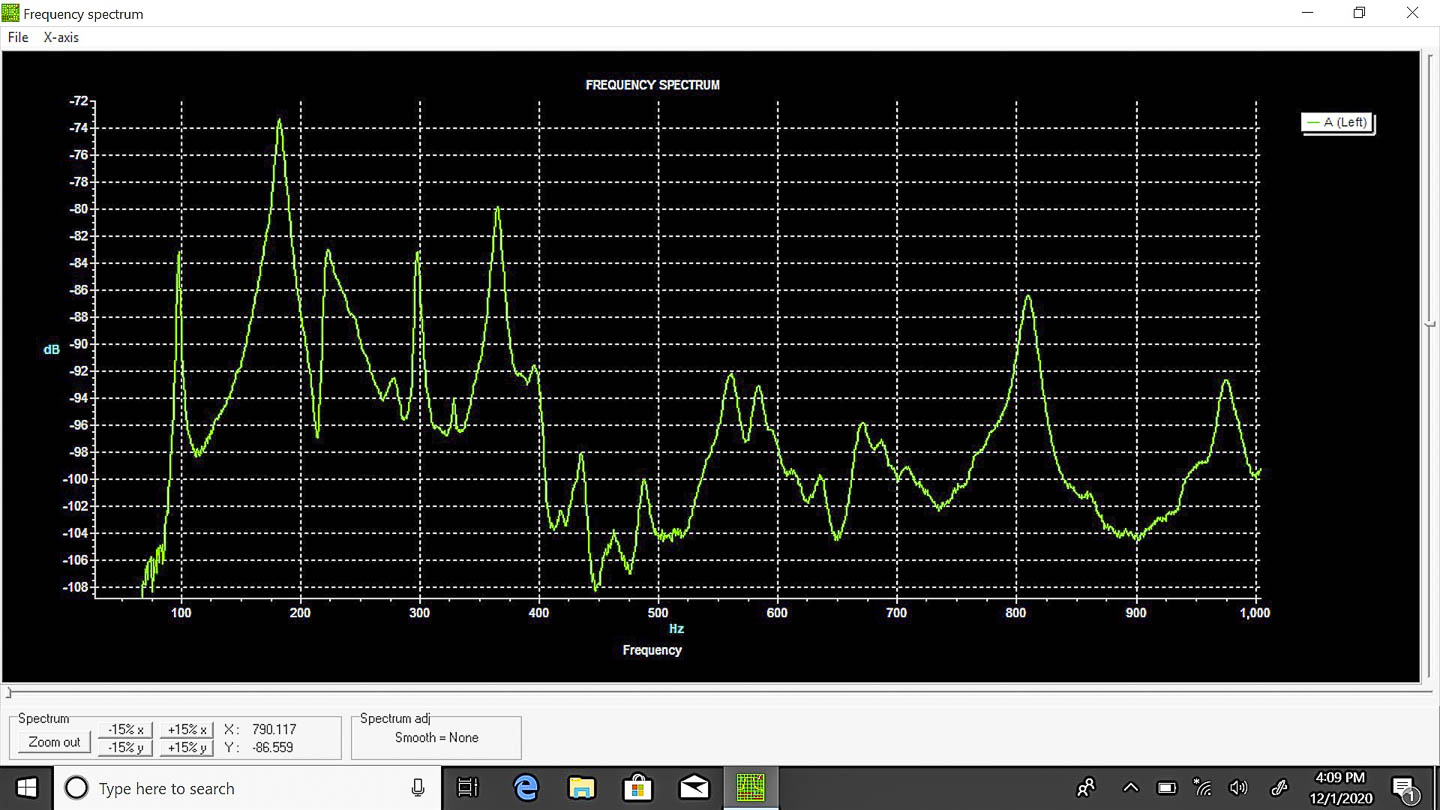
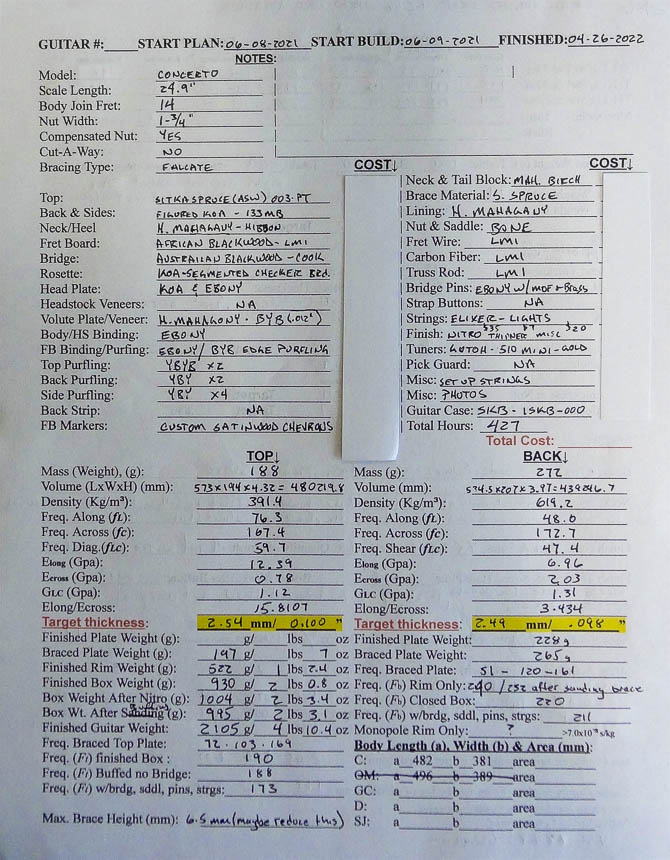
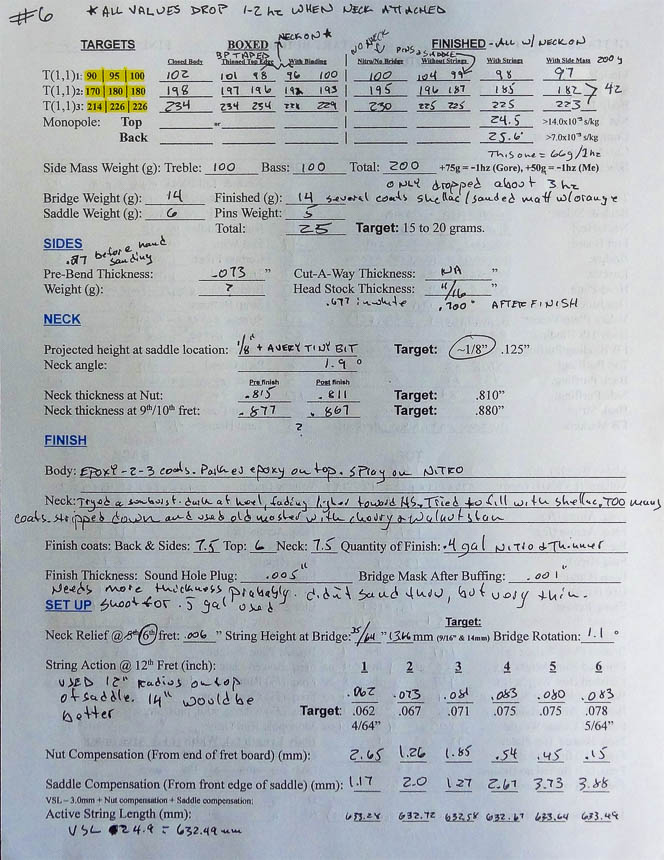
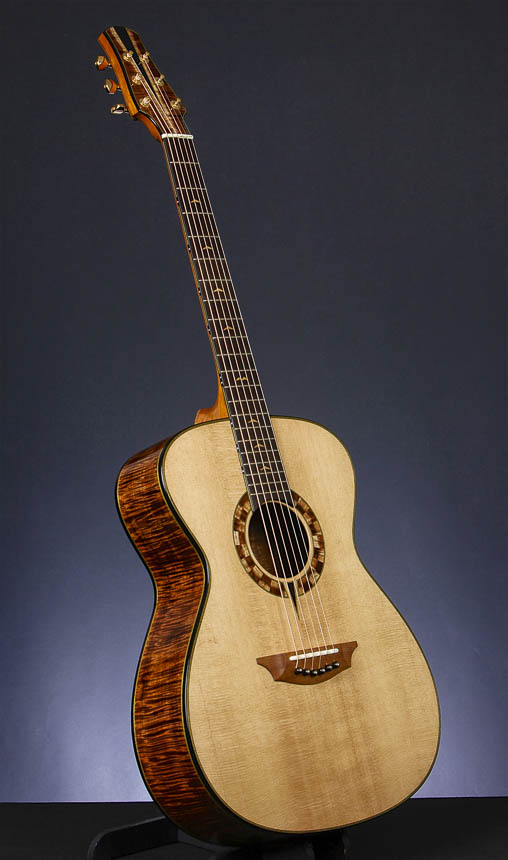
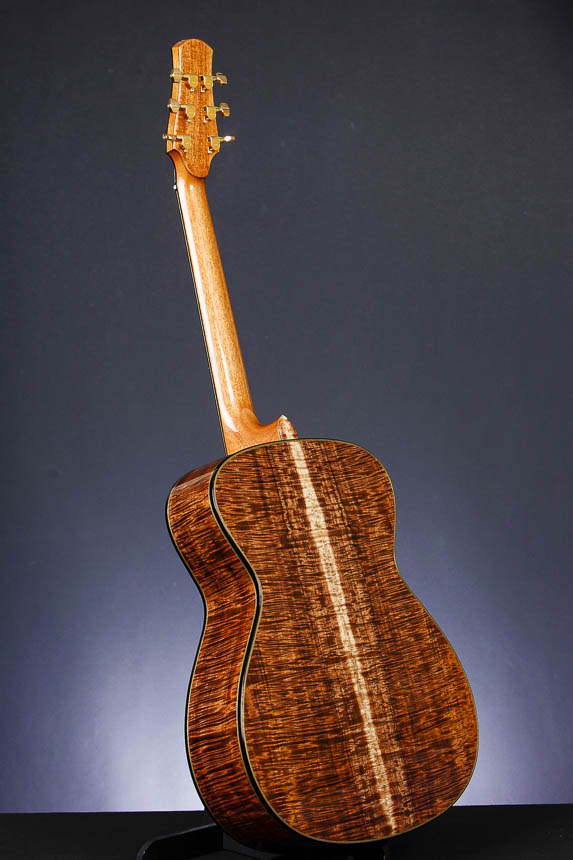
Now that the guitar is completely set up, I touch up the finish by buffing it with fine polishing compound and string it up with a new set of strings. This beauty is born. I return to the spectrum analyzer to record the finished instruments primary resonant frequencies—all of which fell within the range I am shooting for. More importantly, the guitar sounds beautiful. I’ve included the notes I take along the way showing all the data I record for each guitar. This helps me for future builds, with the goal of making each one as exceptional as I can.
I’ve included a few shots of the completed instrument. To see more, you can find it in the GALLERY page, along with more of my instruments. I hope you have enjoyed this journey as much as I have. Thank you so much for your interest.
HOW I BUILD GUITARS
MATERIALS
NECK & HEADSTOCK
HEADSTOCK: HEADPLATE & VOLUTE
SIDE BENDING
THE RIM
KERFED LINING
CUTTING THE RIM TO WIDTH
SIDE BRACES
TOP & BACK PLATES
ROSETTE
BRACING THE TOP
BRACING THE BACK
THE BOX
BINDING & PURFLING
FITTING THE NECK TO THE BODY
THE FRETBOARD
HEADSTOCK SHAPE, TUNER HOLES, BINDING & PURFLING
GLUING THE FRETBOARD TO THE NECK
SHAPING THE NECK
SHAPING THE HEEL
SHAPING THE VOLUTE
THE BRIDGE
FRET JOB
This Page
THE FINISH
ODDS & ENDS
SET UP & FINAL DETAILS